PROJECT HOMEPAGE TAB
The Project Homepage tab is a central area for project related information and features such as:
- Shared project settings like holdback and tax percentages, project contacts, and security settings.
- Automatically compiled summary reports, forms, and charts.
- Project keyword searches.
The project homepage tab is identified by the ![]() icon:
icon:
Figure 31 The Project Homepage tab
The project homepage is divided into two main sections:
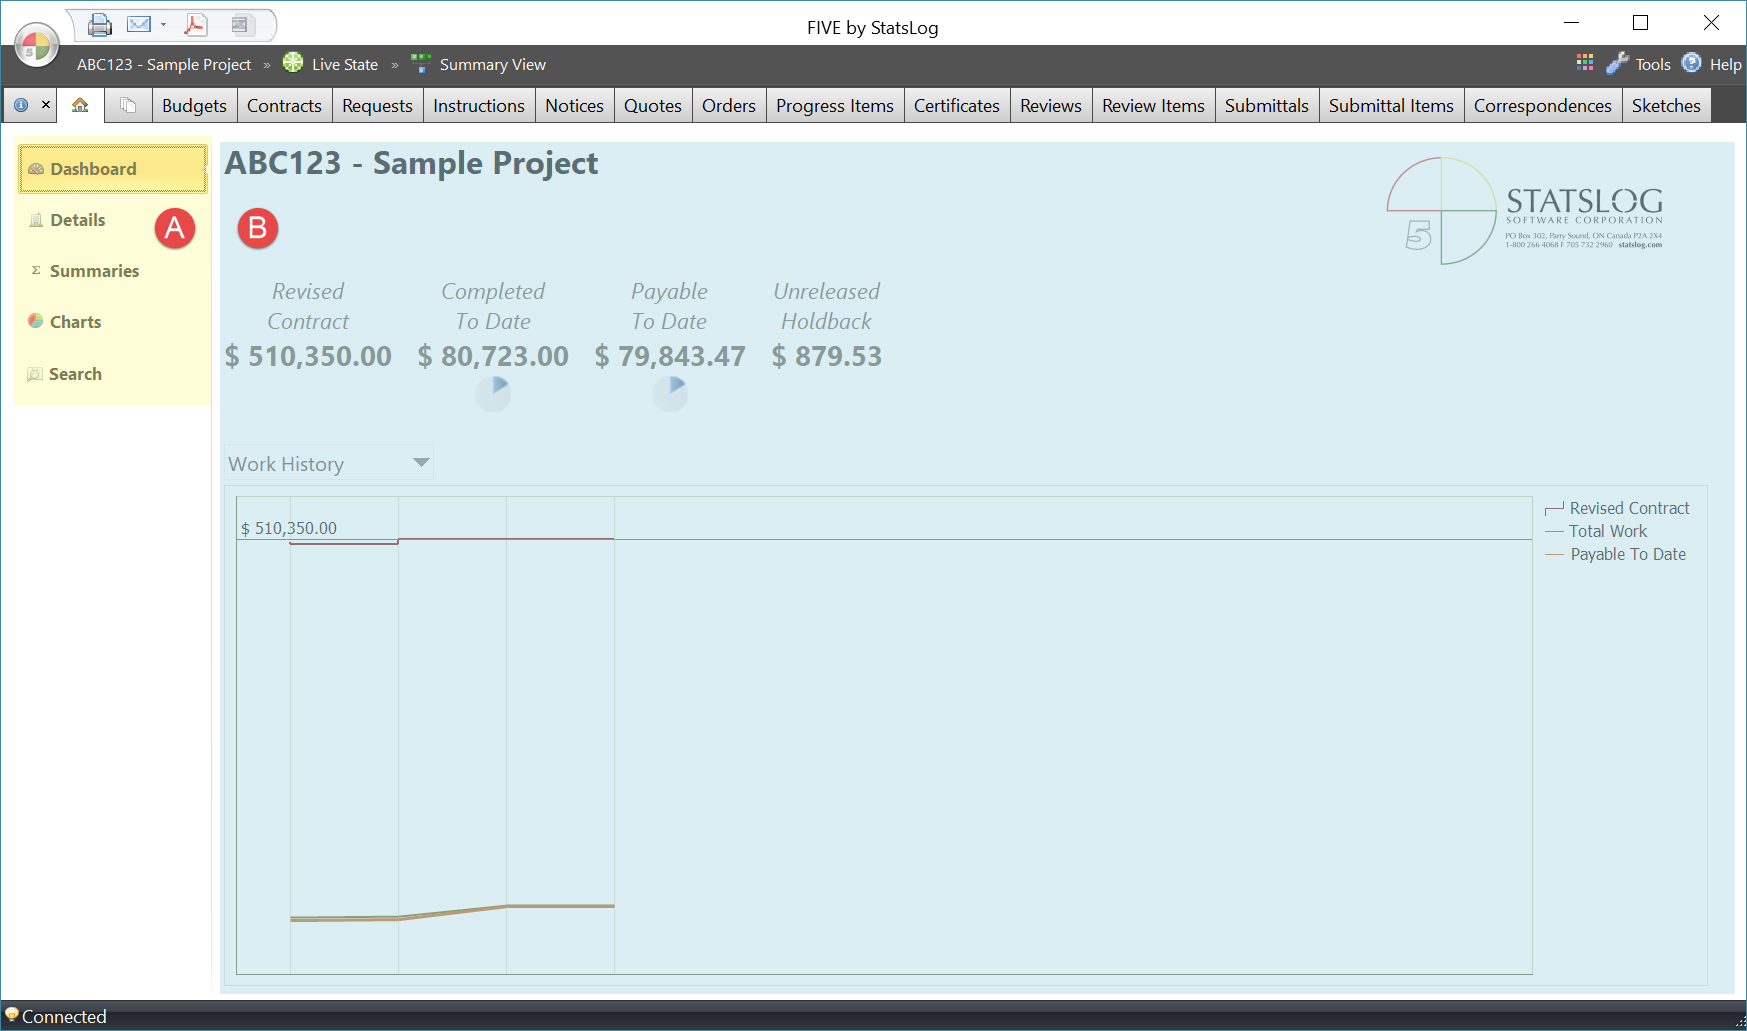
Figure 32 The Project Homepage Sections
| A | Page buttons | Click a page button to show that page in the information area. Pages include the Dashboard Page, Details Page, Summaries Page, Charts Page, and Search Page. |
| B | Information area | Shows information related to the open project and selected page. Examples include: shared data fields, summary reports, and search results. |
Dashboard Page
The Dashboard page automatically collects and displays information entered elsewhere that is related to the current state of the project. This information includes:
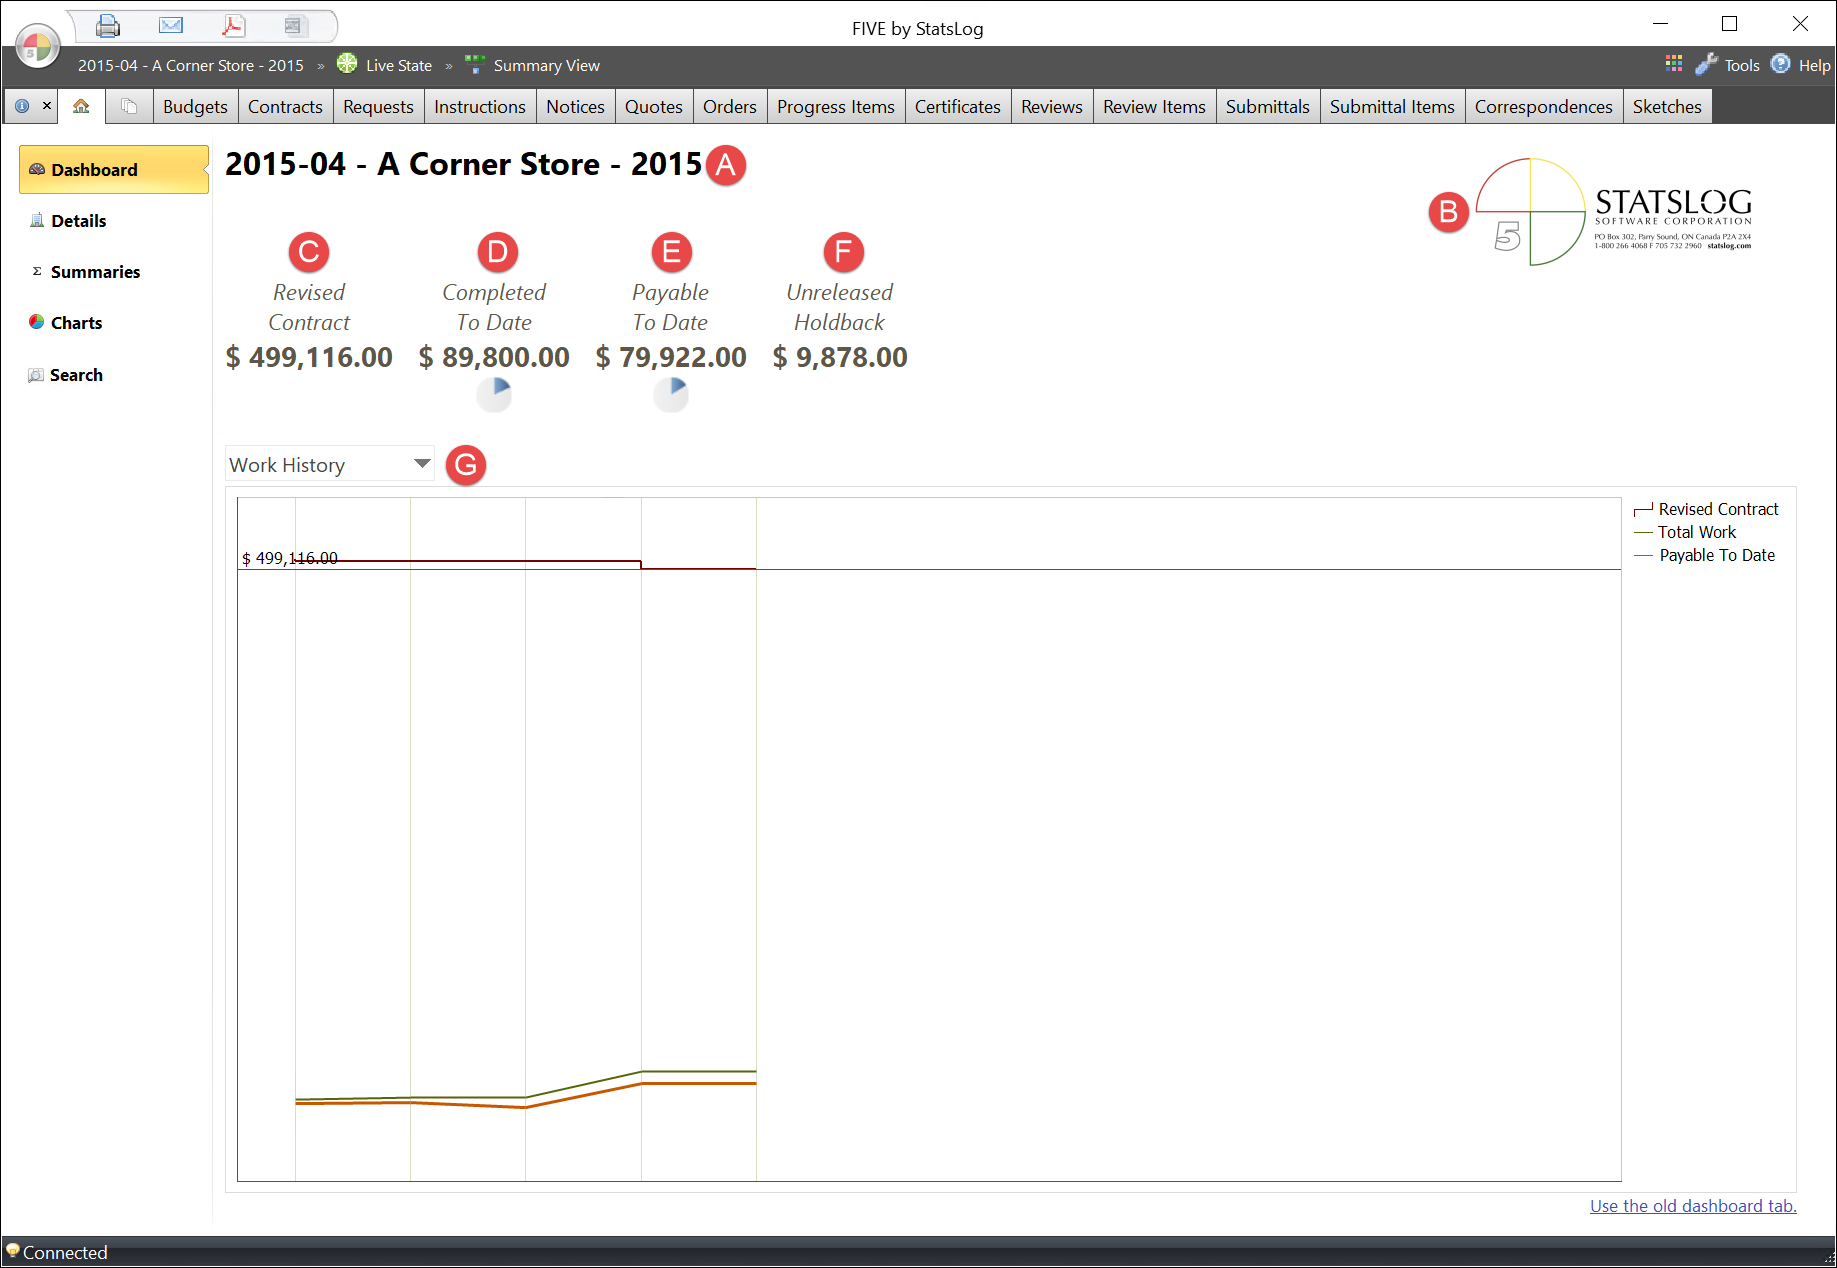
Figure 33 The dashboard page
| A | Project Reference Number & Title | The unique project reference number and title of the active project. These can be modified on the project homepage details page. |
| B | Project Logo | A logo associated with the project. Usually this is your company logo, but it can be a joint venture logo, government logo, etc… Click the logo to select a different image. |
| C | Revised Contract Amount | The sum of the original contract amount (including all scope of work items, allowances, and contingency funds as itemized on the Contracts tab) and all approved changes to the original contract (as itemized on the Orders tab). |
| D | Completed to Date Amount | The sum of the amount of work that has been completed to date for all items itemized on the Progress Items tab. |
| E | Payable to Date Amount | The sum of all work completed to date, less applicable holdback. |
| F | Unreleased Holdback Amount | The amount of applicable holdback to date that has not yet been released. |
| G | Summary Charts | There are 2 dashboard charts available: Work History This line chart shows the revised contract value, work completed, and payable amount at each issued certificate over the life of the project, providing a visual indication of how the project work is progressing. Issued Items History This area chart shows the number of documents logged of any type over the life of the project. You can select whether to count and group documents by daiy, week, or month. You can also select which types of documents you want to see. For example, you can see the number of SIs issued each month, or COs issued each week, etc… Click any node on the Work History chart to see a detailed list of each item issued during the selected period. You can switch between the two charts by clicking the name of the currently selected report, then select the desired report from the list that appears: 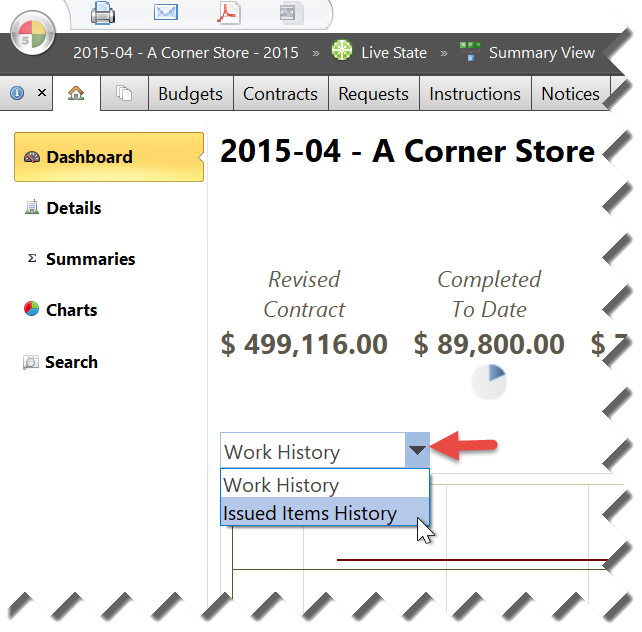
|
Details Page
The Details page is where you define shared project information like holdback and tax percentages, important project contacts (like the owner, builder, designer, etc…), and define project-level security settings.
This page is the starting point of miMO – minimum input for maximum output – in FIVE. Settings and values that you define here are automatically used in your forms and reports without requiring re-typing, saving you time while avoiding potentially costly errors and omissions that are typical of reptitive manual processes.
The Details page includes the following 3 sub-pages:
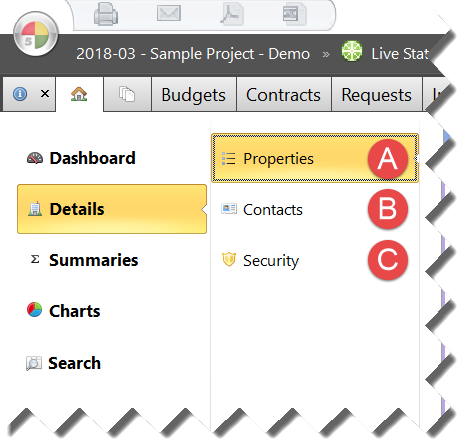
Figure 34 The Details Page Sub-Pages
| A | Properties | On this page you can specify project properties such as reference #, title, holdback and tax percentages, etc… |
| B | Contacts | On this page you can specify contacts associated with the project, and specific roles within the project (such as Owner, Builder, Designer, etc…) |
| C | Security | On this page you can limit access to the project to specific users. |
When you click the Details button on the project homepage, you will be taken to the Properties Page.
Properties Page
The Properties page is divided into the following tabs of related information:
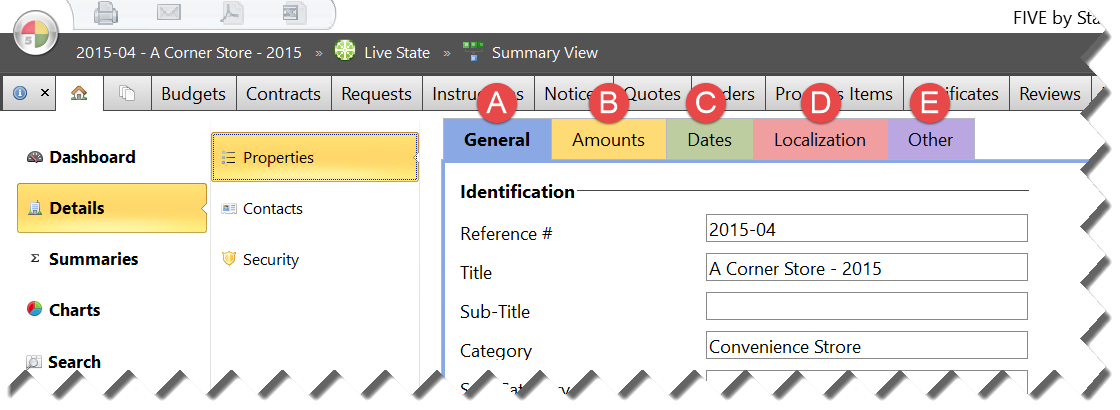
Figure 35 The Project Properties Page Tabs
| A | General | This tab is for general information about the current project, such as reference #, title, and description. |
| B | Amounts | This tab is for amounts that will be used by FIVE’s built-in formulas, such as the substantial completion amount, and holdback and tax percentages. |
| C | Dates | This tab is for defining various important dates. |
| D | Localization | This tab is for configuring location/region specific settings, such as currency and date formats. |
| E | Other | This tab is for all other project specific settings not covered above, such as project-level smart folder fields, and report scheduler options. |
General Tab
The General tab is for information about the current project. Information on this tab can appear on your form templates without requiring hard-coding or re-typing.
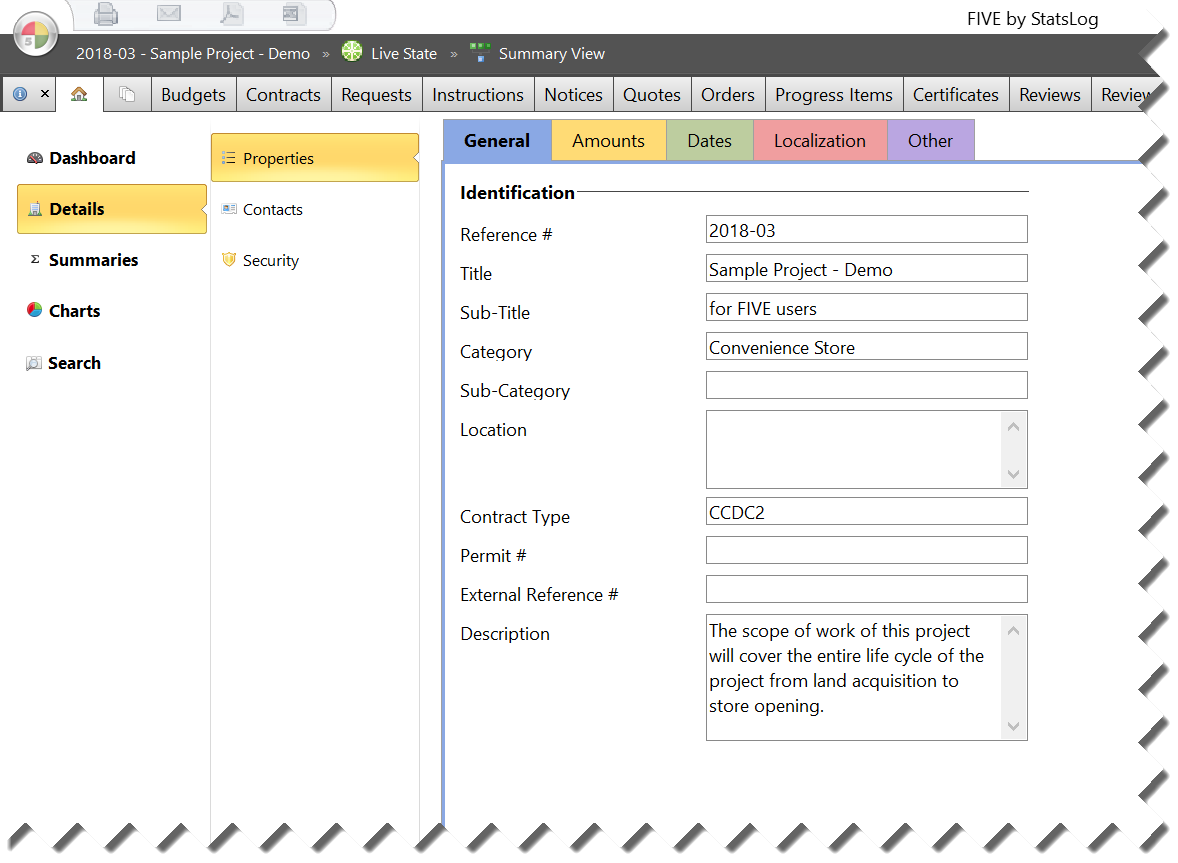
Figure 36 The General Tab of the Project Properties Page
The fields available on this tab are:
| Reference # | Required, Unique | An internal number that uniquely identifies the project. For example, ABC123. This value must be unique to the project. |
| Title | Required, Unique | A short title that uniquely identifies the project. For example, XYZ Condominiums. This value must be unique to the project. |
| Sub-Title | Optional | Additional information that identifies the project. For example, Renovation of the first floor. |
| Category | Required | A category that describes the project type. Categories are user-definable, and generally used to help search for groups of projects. There are no set rules for what categories you may use, as the list is highly dependent on the type of work you do. Examples might include Renovations, Hospitals, Condos, etc… |
| Sub-Category | Optional | An additional category (or categories) that describes the project type. |
| Location | Optional | The physical location of the project. For example a street address, city, etc… |
| Contract Type | Optional | The contract type of the project. For example, CCDC2, CCDC5, Design-Build, etc… |
| Permit # | Optional | The permit number of the project. |
| External Reference # | Optional | A reference number used by an external party to identify the project (usually the general contractor’s or owner’s project reference number). |
| Description | Optional | A short description of the project. This is useful for searching. |
Amounts Tab
The Amounts tab is for defining amounts that will be used by FIVE’s built-in formulas, such as the substantial completion amount, and holdback and tax percentages.
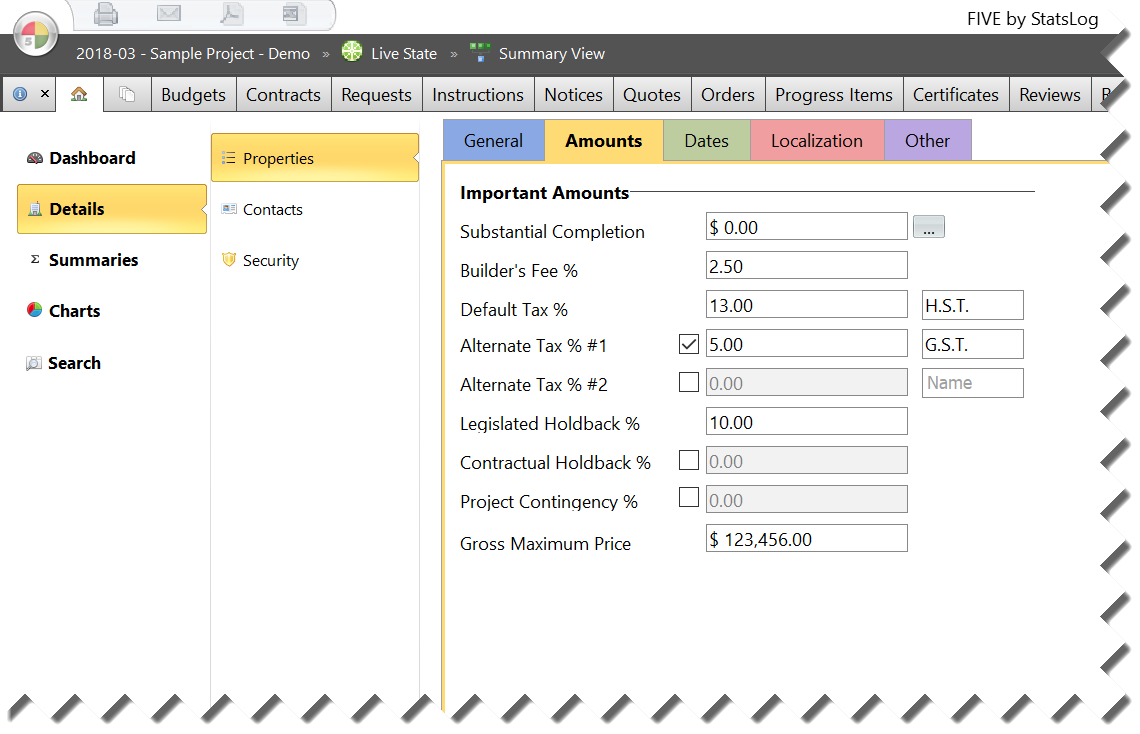
Figure 37 The Amounts Tab of the Project Properties Page
The fields available on this tab are:
| Substantial Completion | Optional | You can enter any amount here, or choose from one of the pre-defined automatically calculated substantial completion/performance rules by clicking the … button. Automatic substantial completion amount calculations are available for the following jurisdictions:
Note If your project is not in one of the jurisdictions listed above, please contact StatsLog Support. |
| Builder’s Fee | Optional | A percentage of the original contract amount that is representative of the builder’s fee. If you enter a percentage here, a Builder’s Fee line item with be automatically created on the Contracts tab. |
| Default Tax % | Optional, Recommended | The legislated tax % for projects in the project’s jurisdiction. For example: at the time of writing, in Ontario the default tax % shuold be the HST rate of 13%. In Alberta it should be the GST rate of 5%. You can optionally define a name for this tax rate in the box to the right of the percentage. This name can appear on your form templates. |
| Alternate Tax 1 % | Optional | A secondary tax % for projects that cross multiple jurisdictions, or where different tax rates apply for different work. You can optionally define a name for thistax rate in the box to the right of the percentage. This name can appear on your form templates. |
| Alternate Tax 2 % | Optional | A tertiary tax % for projects that cross multiple jurisdictions, or where different tax rates apply for different work. You can optionally define a name for this tax rate in the box to the right of the percentage. This name can appear on your form templates. |
| Legislated Holdback % | Optional, Recommded | The legislated holdback % for construction projects in your jurisdiction. At the time of writing, in Canada the legislated holdback should be 10%. |
| Contractual Holdback % | Optional | The contractual (or warranty) holdback percentage for the project. Not all contracts involve contractual/warrant holdback and in most cases this value can be left at 0%. |
| Project Contingency % | Optional | The % of the original contract amount to be reserved for a contingency fund. Some contracts use flat rate contingency fund(s) that are itemized on the Contracts tab, in which case this value can be left at 0%. |
| Gross Maximum Price | Optional | The maximum price of the contract, where applicable as per the contract type. Also called Guaranteed Maximum Price. For non-GMP contracts, this should be left at $0.00. |
Dates Tab
This tab is for defining various dates of importance to the project. You can click the ![]() button beside any field to select a date from the calendar.
button beside any field to select a date from the calendar.
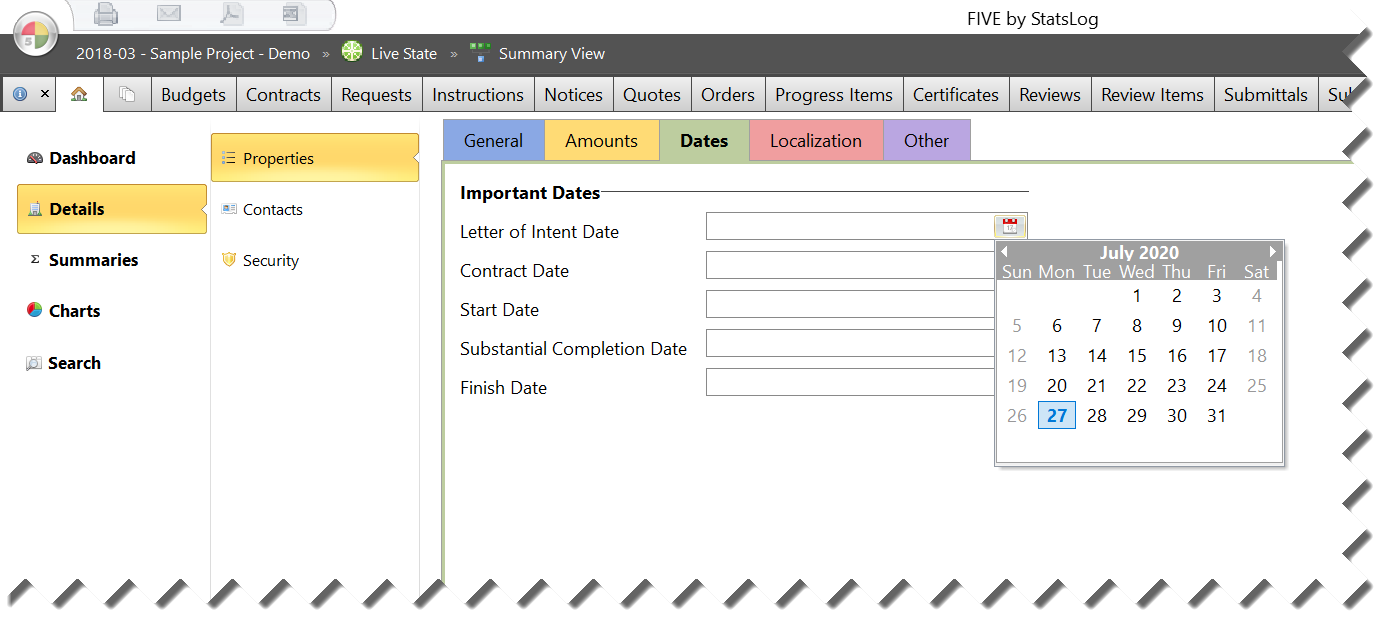
Figure 38 The Dates Tab of the Project Properties Page
The fields available on this tab are:
| Letter of Intent Date | Optional | The date that your client sent a letter of intent to the contractor, expressing the intention to proceed with the work, but before the agreement is finalized as a contract. |
| Contract Date | Optional | The date that the construction contract documents were signed and witnessed. |
| Start Date | Optional | The date that construction is expected to begin. |
| Substantial Completion Date | Optional | The date that substantial performance/completion of the contract is expected to have been reached. Note This date marks the fulfillment of the obligations agreed to in the contract documents, with only slight variances from the exact terms or unimportant omissions and minor defects. |
| Finish Date | Optional | The date that the project is expected to be contractually complete. Note The contract is complete when all deficiencies have been remedied, all authorities having jurisdiction are satisfied, all occupancy permits have been secured, etc… |
Localization Tab
This tab is for configuring location/region specific settings, such as currency and date formats.
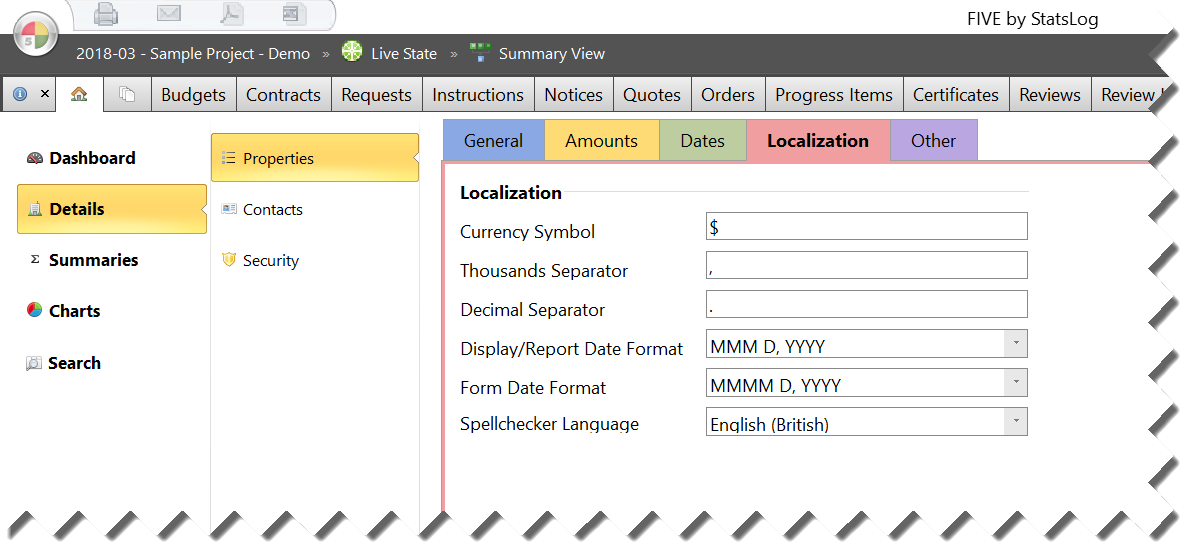
Figure 39 The Localization Tab of the Project Properties Page
The fields available on this tab are:
| Currency Symbol | Required, Unique | The symbol used for currency values (for example, $). This is a required entry, and must be unique compared to the Thousands Separator and Decimal Separator symbols. |
||||||||||||||||||||||||||||
| Thousands Separator | Required, Unique | The symbol used to separate groups of thousands in numbers. For example, the , (comma) in $1,000.00. This is a required entry, and must be unique compared to the Currency Symbol and Decimal Separator symbols. |
||||||||||||||||||||||||||||
| Decimal Separator | Required, Unique | The symbol used to separate fractional portions of numbers from the whole integer portion. For example, the . (decimal) in $1,000.00. This is a required entry, and must be unique compared to the Currency Symbol and Thousands Separator symbols. |
||||||||||||||||||||||||||||
| Display/Report Date Format | Required | The format for date values shown on the screen and on exported reports. Options are:
|
||||||||||||||||||||||||||||
| Form Date Format | Required | The format for date values shown on forms. For examples, see the Display/Report Date Format section above. | ||||||||||||||||||||||||||||
| Spellchecker Language | Required | The language to be used by the form body text spell-checker. Options are:
|
Other Tab
This tab is for all project specific settings not covered by any of the above sections, such as project-level smart folder fields and report scheduler options.
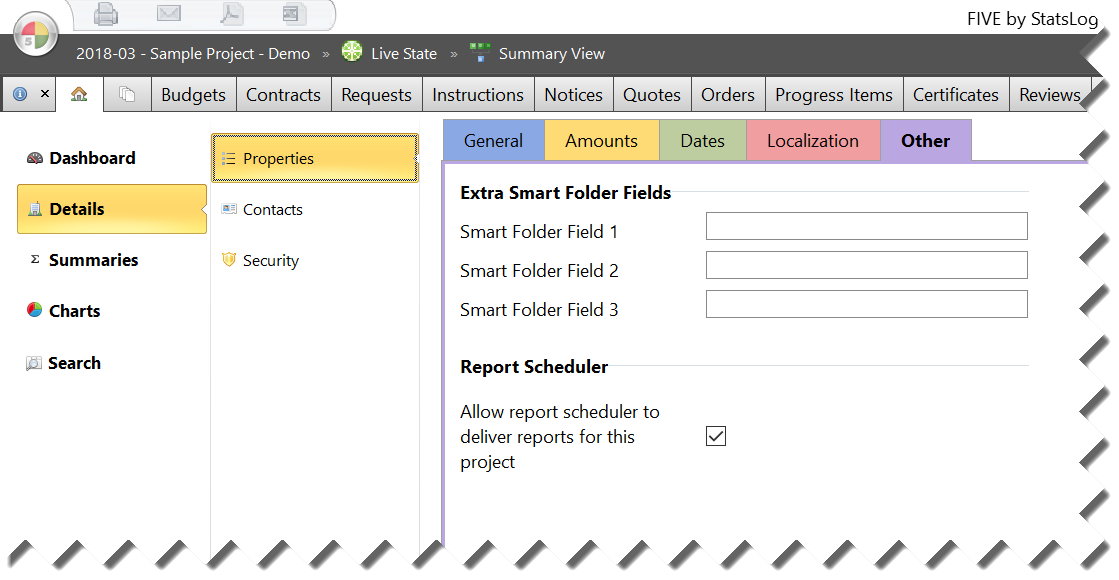
Figure 40 The Other Tab of the Project Properties Page
The fields available on this tab are:
| Smart Folder Field 1 | Optional | A custom value related to the project for use with Smart Folders. |
| Smart Folder Field 2 | Optional | A custom value related to the project for use with Smart Folders. |
| Smart Folder Field 3 | Optional | A custom value related to the project for use with Smart Folders. |
| Allow report scheduler to deliver reports for this project | Optional | When selected, the current project will be included in automated scheduled report deliveries (where applicable). When cleared, the current project will be skipped during automated scheduled report deliveries. |
Contacts Page
The Contacts page is where you select contacts that are related to the project from the shared FIVE address book. Contacts can be assigned to roles like Designer, Owner, Builder, etc… making it easy to ensure the right people are getting the right information at the right time.
This page is another great example of miMO in action – by selecting project contacts here, their information will be automatically used throughout the project on templates, distribution lists, and emails without requiring re-typing.
Selecting Contacts
There are 4 primary contact roles – or “slots” – for which you can assign contacts: Owner, Builder, Designer, and Contract Administrator. For each of the primary roles, there is an additional assignable role that is typically used for an assistant or representative of the primary contact role. Beyond the primary and secondary roles, you can associate an unlimited number of additional contacts without a role that will be available for document linking and distribution.
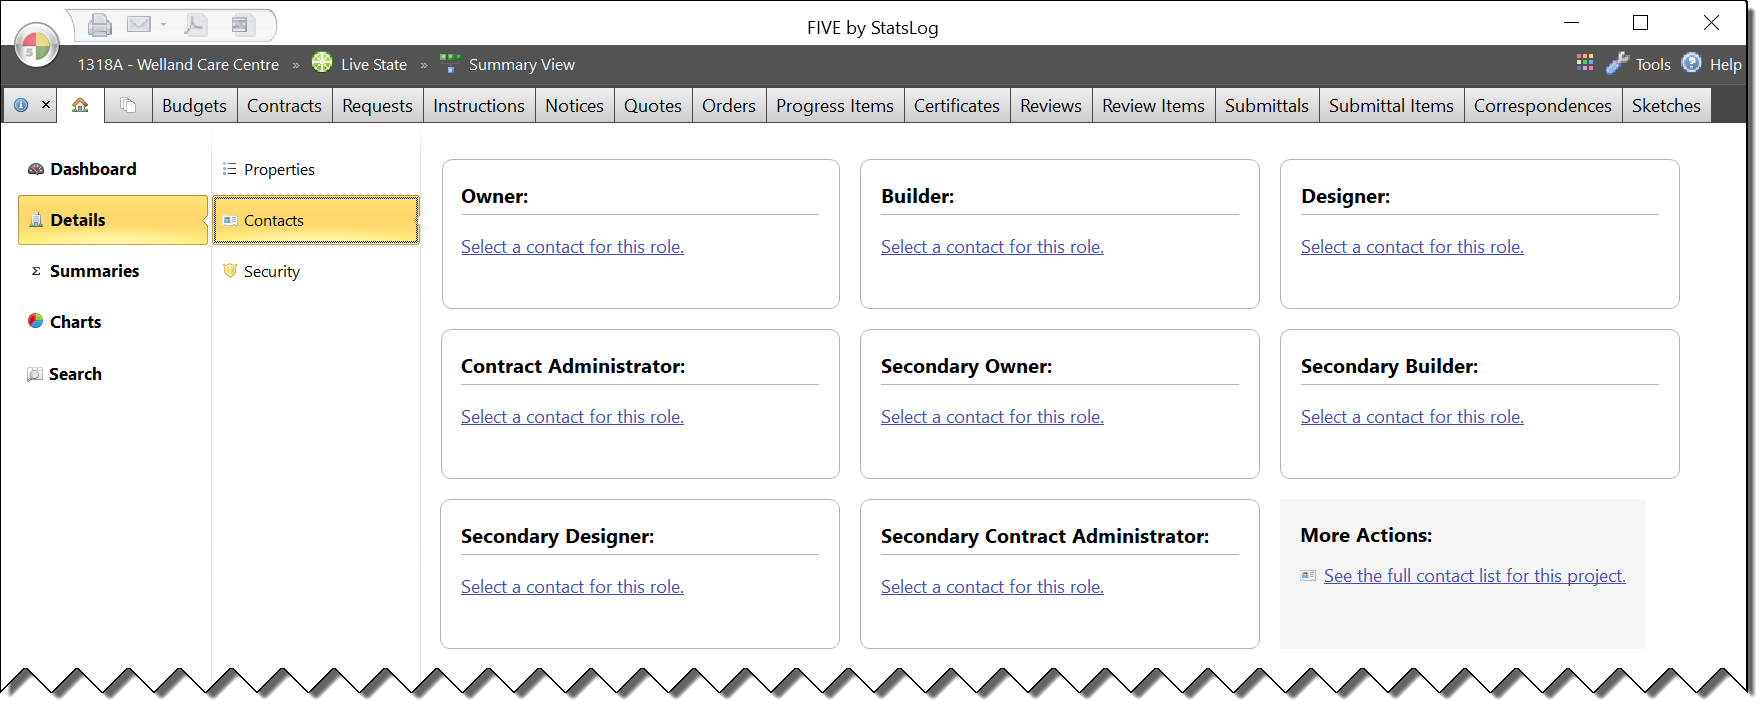
Figure 41 The Contact page with no contacts selected for any roles. Links can be clicked to select contacts related to the project.
There are 2 ways to select contacts for your project, depending on whether they have a primary role in the project (such as the owner, builder, or designer), or a non-primary role (such as a consultant).
- To select a contact with a primary role in the project (such as the owner, builder, or designer) click the Select a contact for this role link in the appropriate role area.
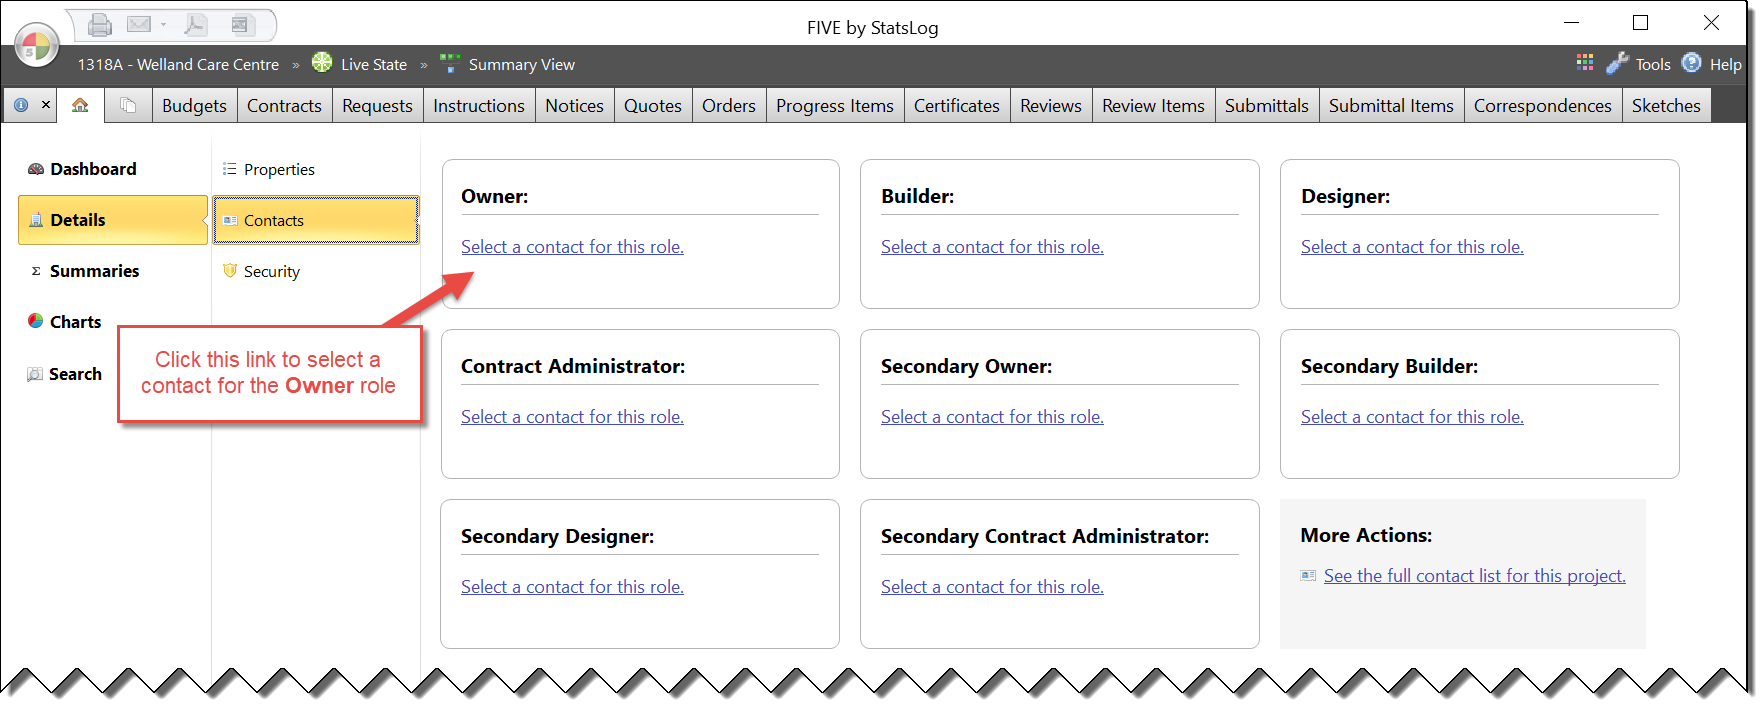
Figure 42 Selecting a contact for a primary role (e.g. Owner).
- To select a contact without a primary role (such as a consultant), click the See the full contact list for the project link in the More Actions section. The Address Book window appears:
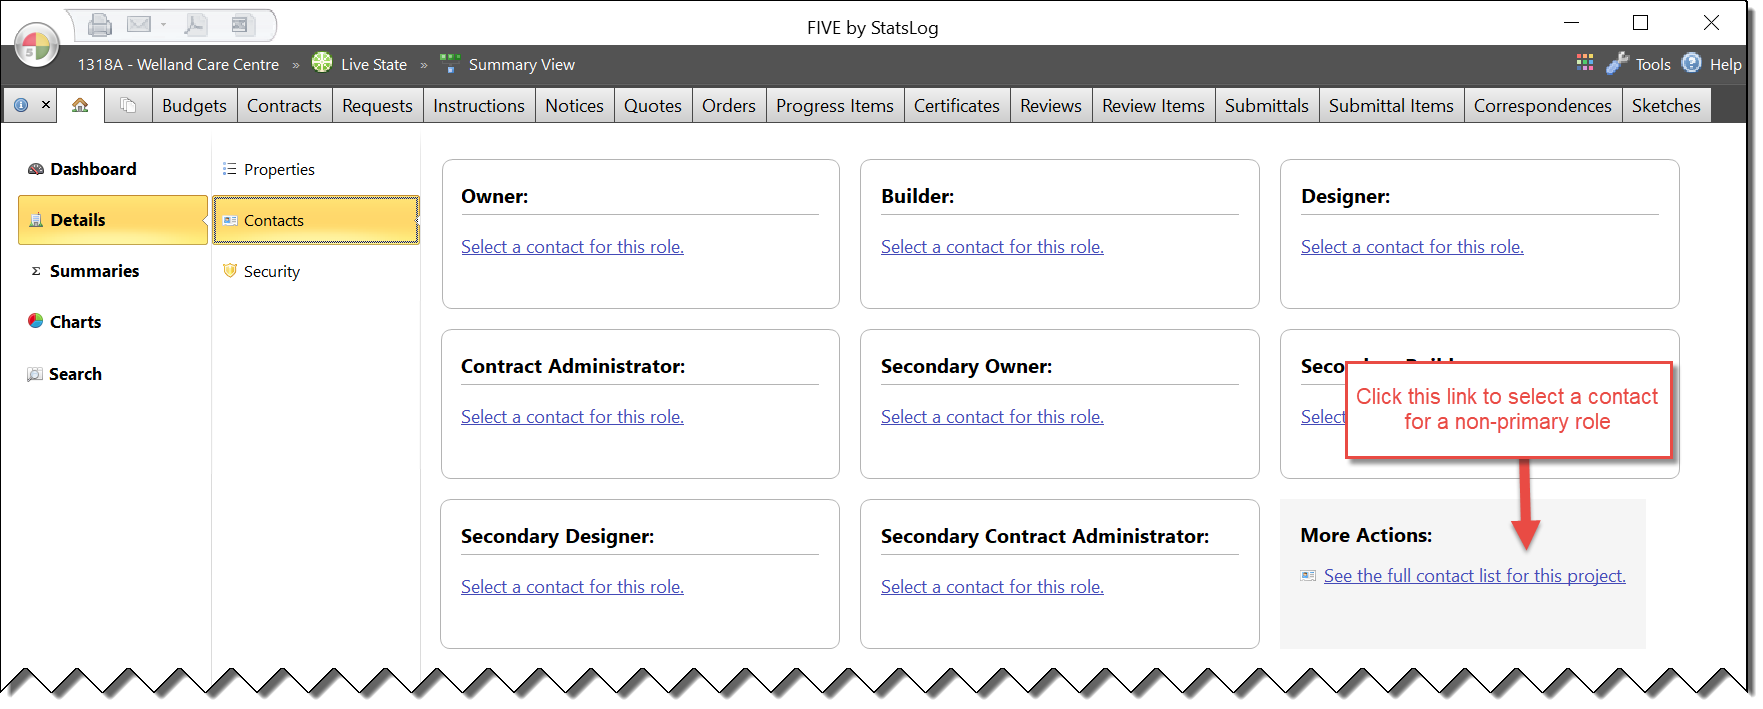
Figure 43 Selecting a contact for a non-primary role (e.g. Consultant).
After performing either of the above steps, the Address Book window appears:
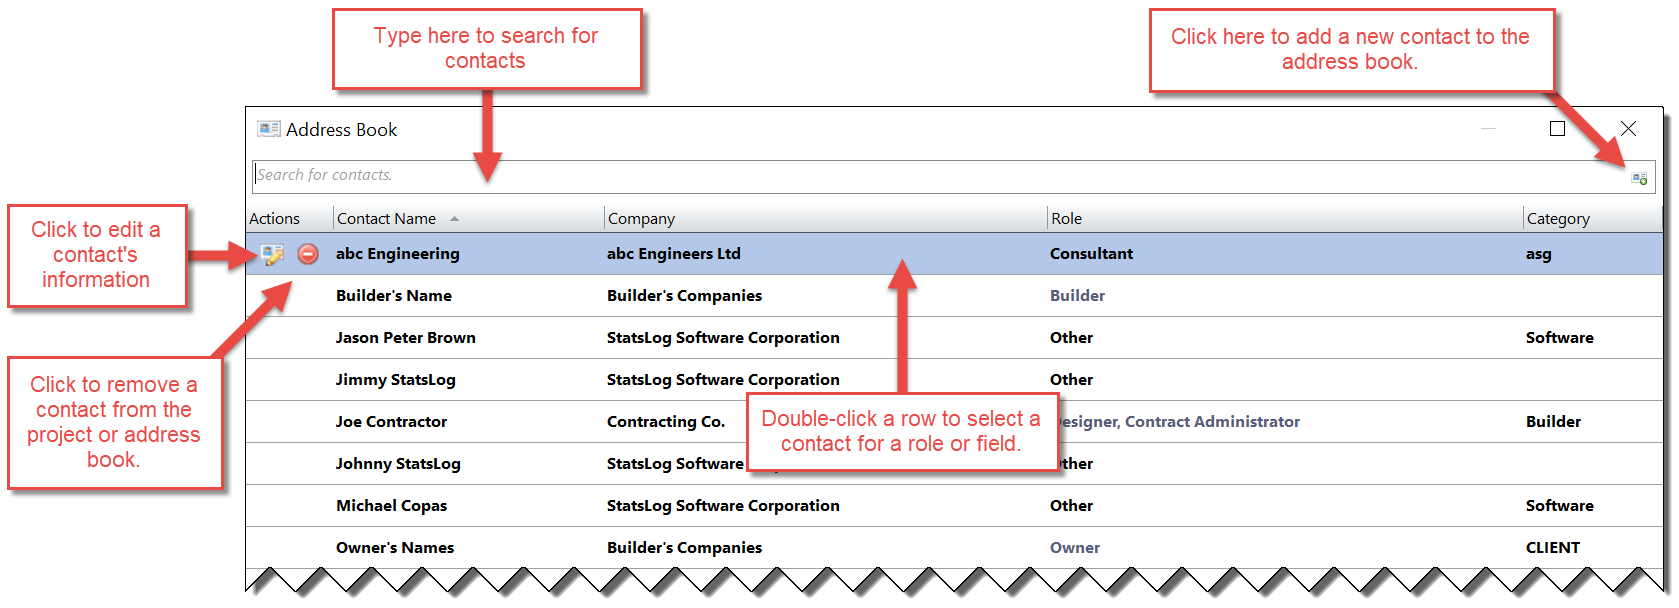
Figure 44 The Address Book window.
On the Address Book window you can:
- Search for contacts by typing their name into the Search for contacts box.
- Select a contact by double-clicking the contact row that you want to select.
- Add a new contact to the address book by clicking the
 button (near the top-right corner of the window).
 - Edit an existing contact’s information by clicking the
 button in the Actions cell on the contact row.
 - Remove a contact from the project or entire address book by clicking the
 button in the Actions cell on the contact row.
Once you’ve selected the project contacts, they are the only contacts that will appear in other parts of the software where you can link contacts to documents, lists, etc… This makes it quick and easy to select the right contact, and means you never have to re-type contact information, virtually eliminating the chance of errors and omissions.
Security Page
The Security page lets you control access to the project by users of your FIVE system. It appears as follows:
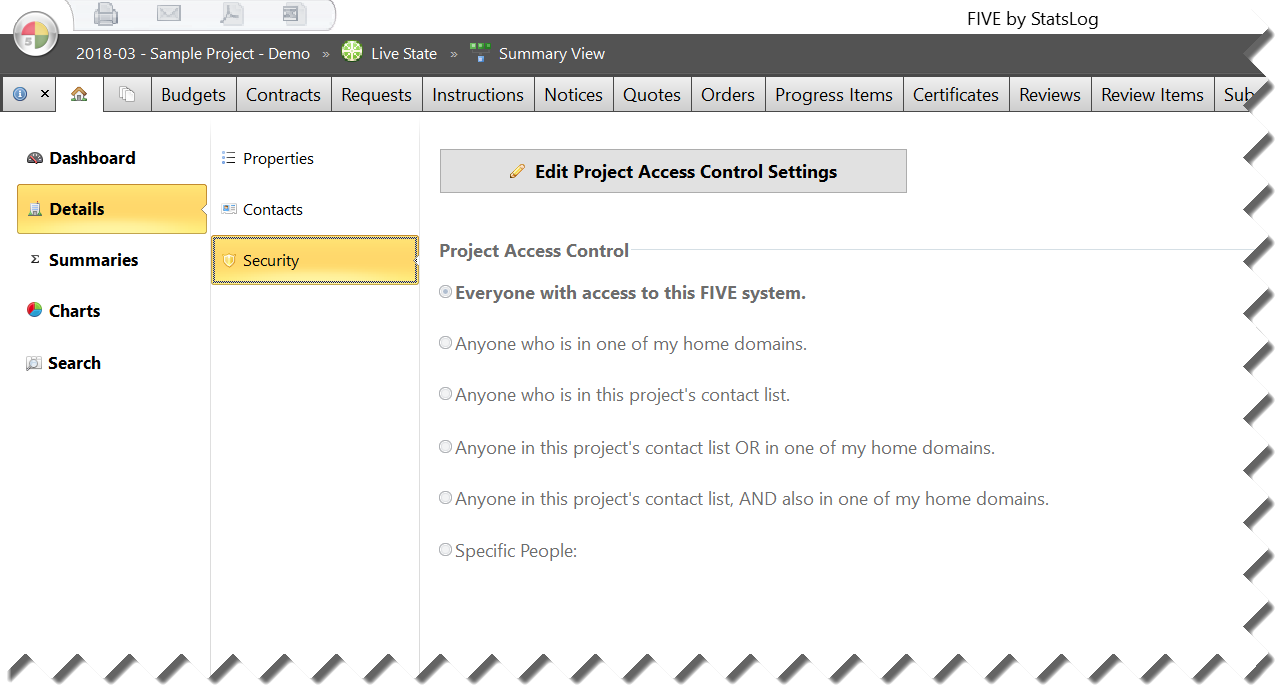
Figure 45 The Project Security window.
Project Access Control Options
The following project access control options are available:
| Everyone with access to this FIVE system |
|
||||||||
| Anyone who is in one of my home domains |
|
||||||||
| Anyone who is in this project’s contact list |
|
||||||||
| Anyone in this project’s contact list *OR* one of my home domains |
|
||||||||
| Anyone in this project’s contact list *AND* also in one of my home domains |
|
||||||||
| Specific People |
|
By default, all new projects will be given the default project access control setting as defined by your FIVE system settings. This is Everyone with access to this FIVE system unless otherwise specified by your FIVE system administrator.
Changing the Project Access Control Option
To change the project access control option:
Click the
 Edit Project Access Control Settings button. The project access control settings will be enabled.
Note
If the Edit Project Access Control Settings button is disabled, you do not have permission to change project access control settings. Please contact your FIVE system administrator to request access to this feature.
Select the project access control setting that you want to apply to the project. The setting will be applied as soon as it is selected.
If you select the Specific People option, type an email address into the Type an email address here to provide access to this project box, then press Enter. The email address is added to the access list, and you can repeat this step for all required email addresses.
Summaries Page
The Summaries page is where you really start to see the benefits of miMO in action. Summary forms and reports are automatically compiled from information logged on other tabs, instantly providing valuable insights into your projects that would be difficult or impossible to achieve with manual spreadsheet/document processes.
When you click the Summaries button, a number of sub-pages appear, and the Overview Page is selected.
Overview Page
The Overview page displays a customizable form that automatically calculates and summarizes the current state of the project. The default overview form template looks like this:
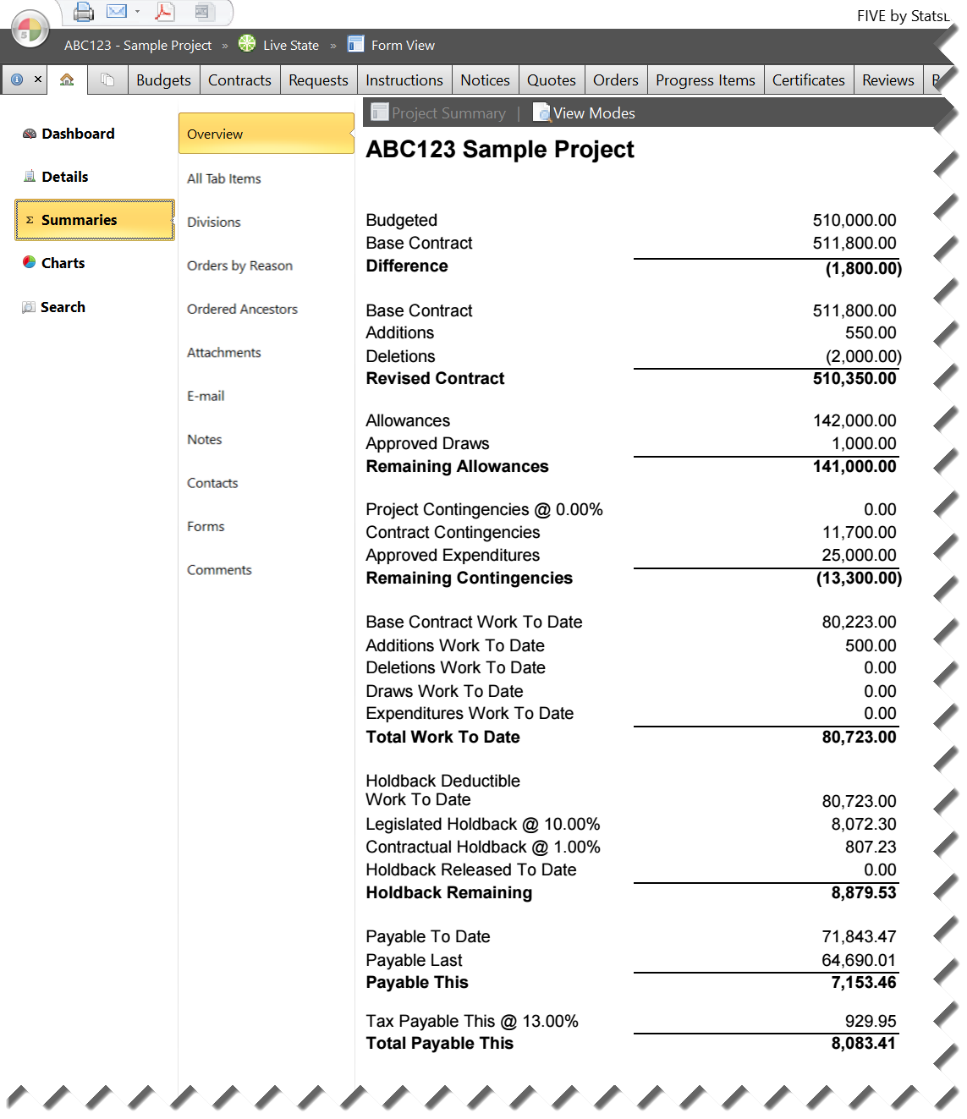
Figure 46 The Project Overview Summary form.
As you can see, values like Base Contract (the sum of all items on the Contracts tab), Additions (the sum of all approved positive changes on the Orders tab), Deletions (the sum of all approved negative value changes on the Orders tab), and Revised Contract (the sum of the aforementioned values) are all calculated for you automatically. Likewise, percentages like Legislated Holdback and Tax, as well as all associated calculations like the Legislated Holdback Amount, Tax Payable This Period, etc… are all performed accurately and automatically by FIVE. This is the power of miMO realized — an instant and accurate summary of the state of your project that is always at your fingertips.
All Tab Items Page
The All Tab Items summary page is a “one-stop-shop” for reviewing every item logged on every tab in the project.
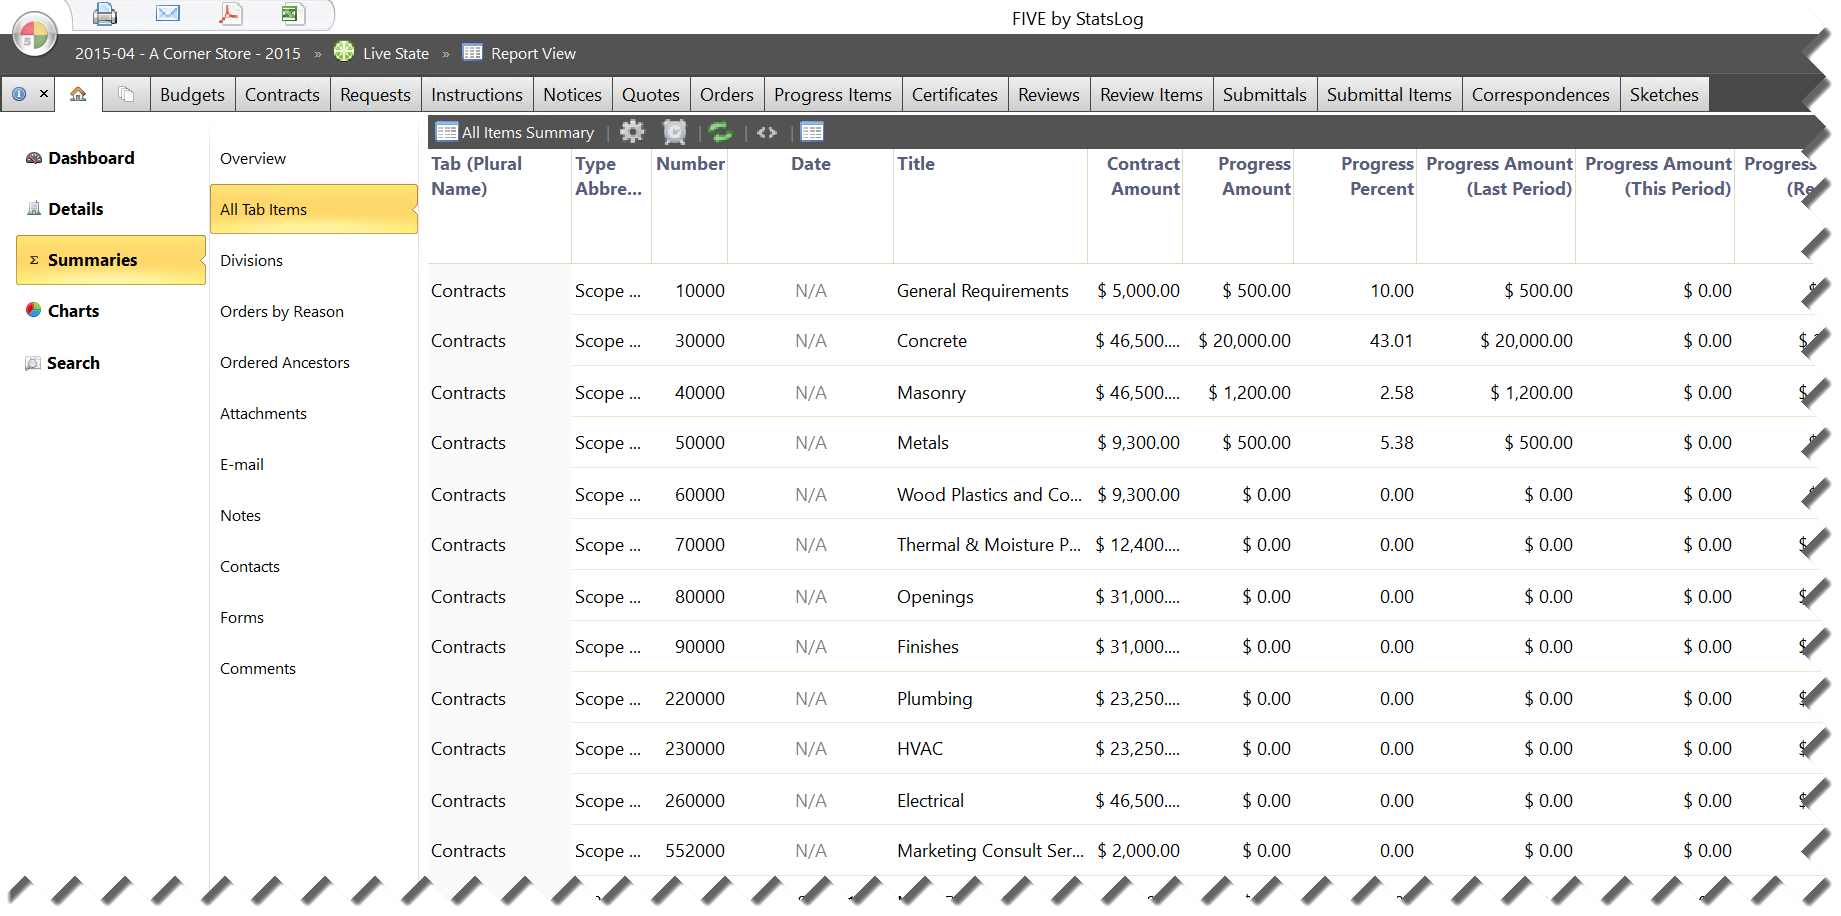
Figure 47 The All Tab Items Summary report.
Divisions Page
The Divisions summary page shows a report that automatically groups all items on the ![]() Contracts tab by division (typically a Master Format division).
Contracts tab by division (typically a Master Format division).
Each grouped division is totalled, showing the impact of each work division on the overall value of the project, as well as the progress of each work division.
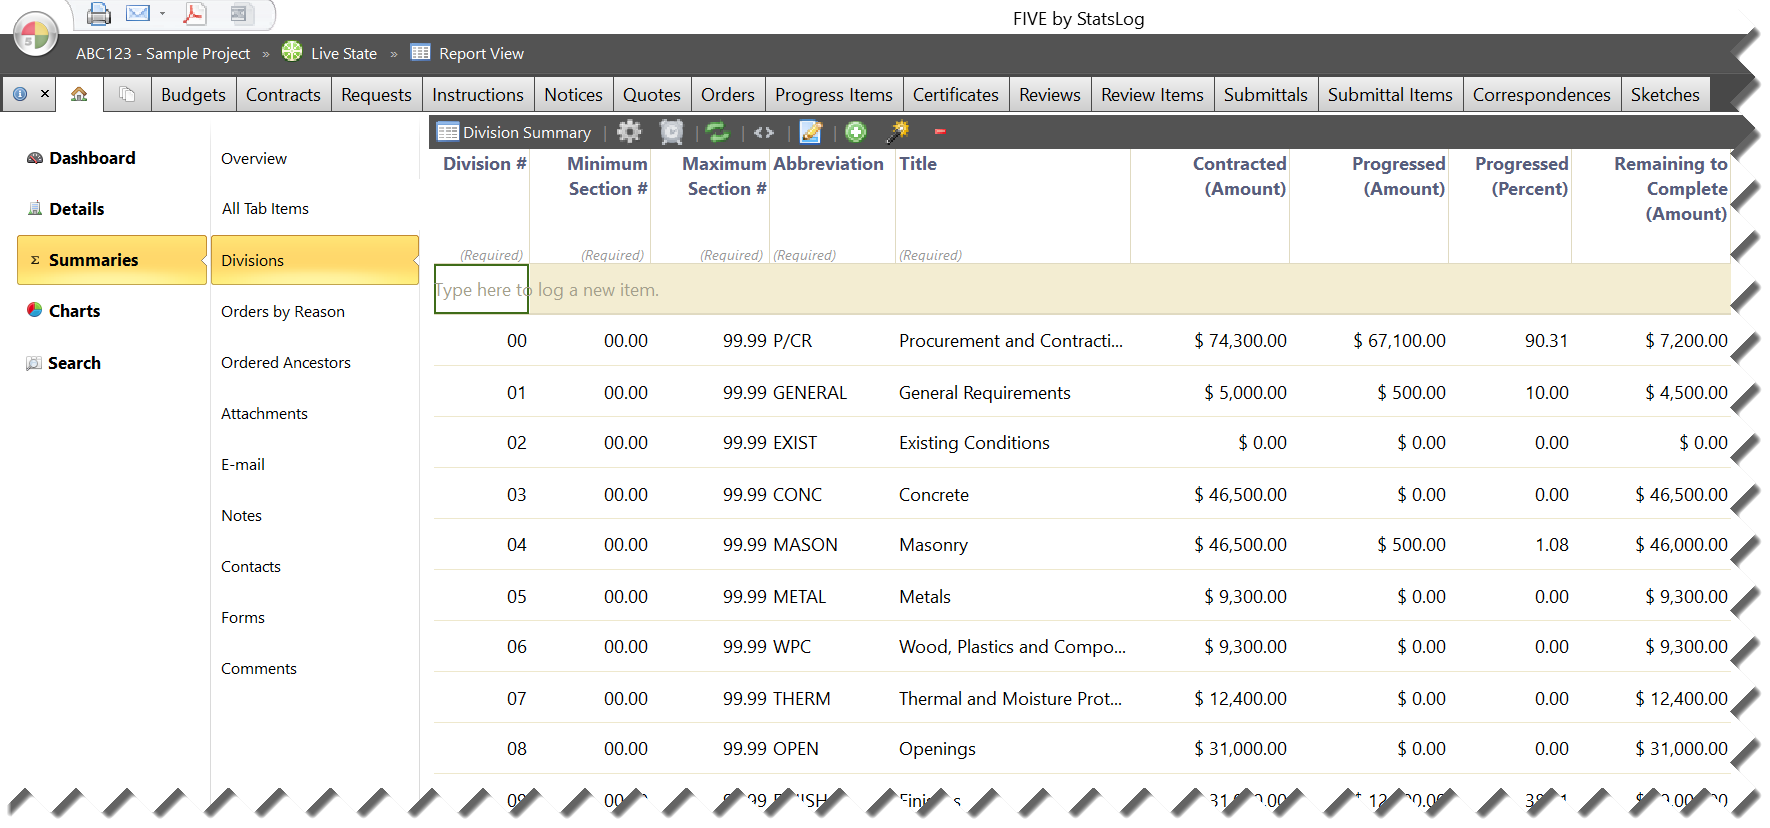
Figure 48 The Division Summary report.
Orders by Reason Page
The Orders by Reason summary page shows a report that automatically groups all items on the ![]() Orders tab by their associated Reason (common reasons include Owner Request, Site Conditions, etc…).
Orders tab by their associated Reason (common reasons include Owner Request, Site Conditions, etc…).
Each grouped reason is totalled, showing the impact of each reason for change on the overall value of the project.
Tip
To get the most out of this report, make sure to select a reason for every change order you log on the Orders tab. This report will be invaluable at project meetings!
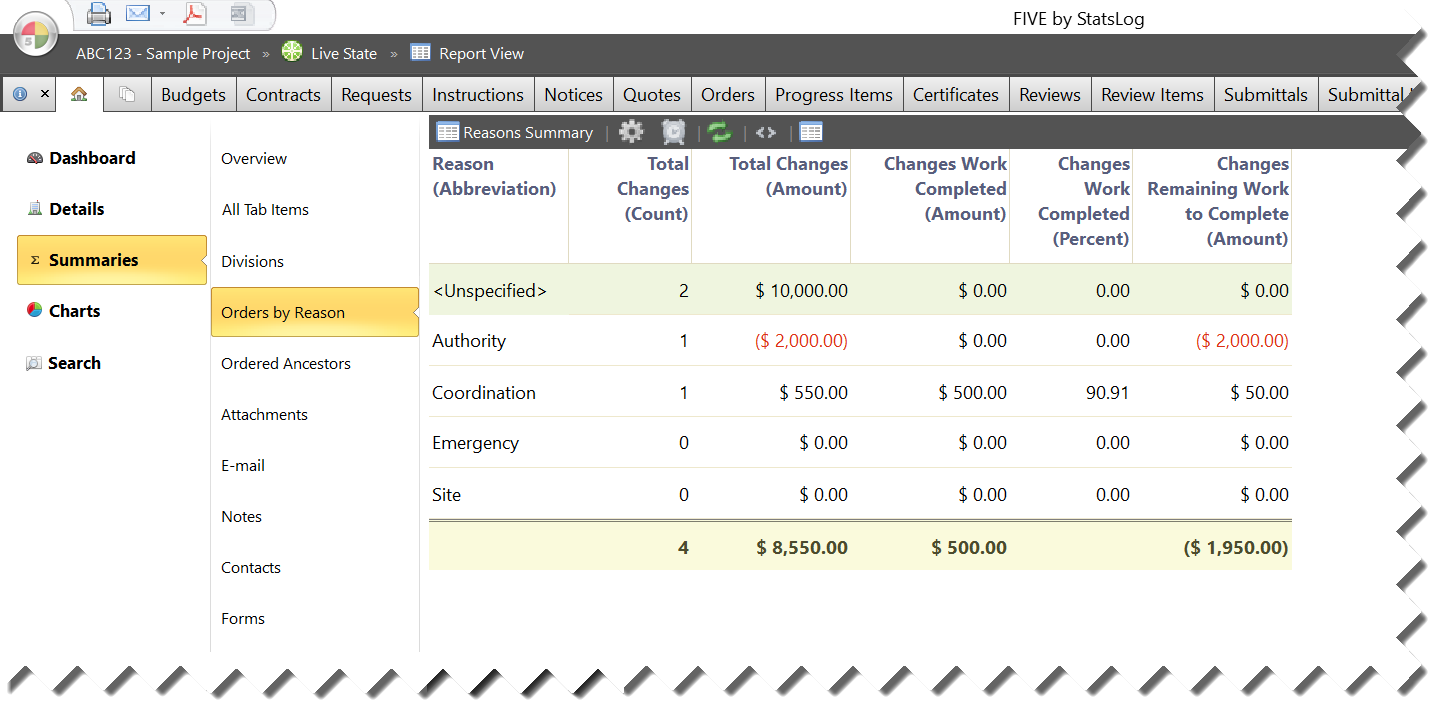
Figure 49 The Orders by Reason Summary report.
Ordered Ancestors Page
The Ordered Ancestors summary page shows a report of every item from the Requests, Instructions, Notices, and Quotes tabs combined with any linked items from the Orders tab. This allows you to quickly see the impact of these items on the contract value or time.
For example, you might discover that a particular RFI has resulted in an unusually high addition to contract value, giving you a target for further investigation and inquiry.
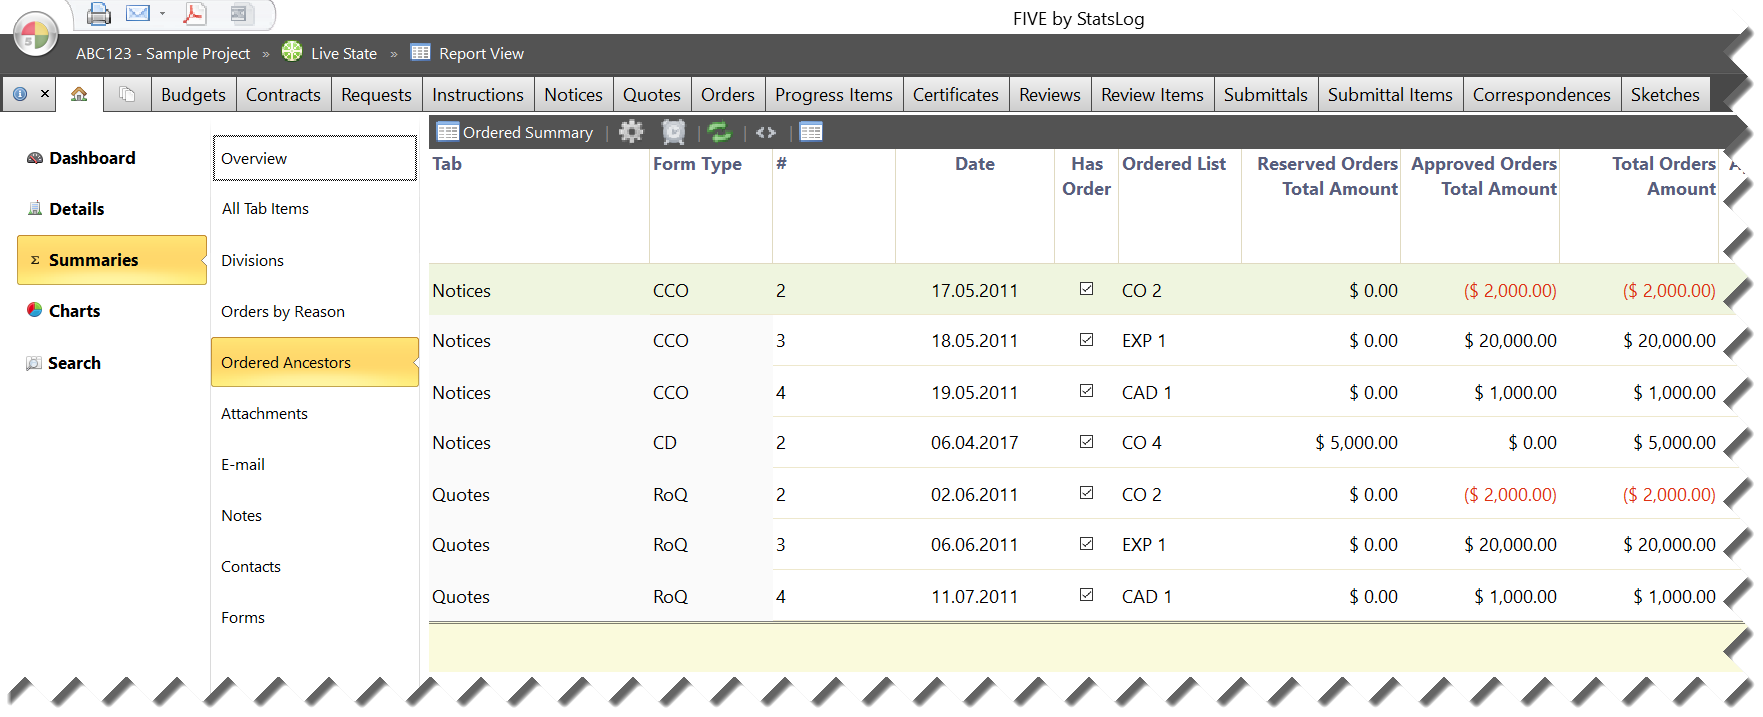
Figure 50 The Ordered Ancestors Summary report.
Attachments Page
The Attachments summary page shows a report of every attachment to every item from every tab, making it to convenient to manage attachments.
The Attachments summary report includes all the features of item-specific Attachments View reports on other tabs, so you can do things like open any attachment in its default viewer application, save attachments to your computer, copy or move attachments to other items in the project, and delete attachments. These actions are available in the Report Action Bar (shown below) based on your user account permission level:
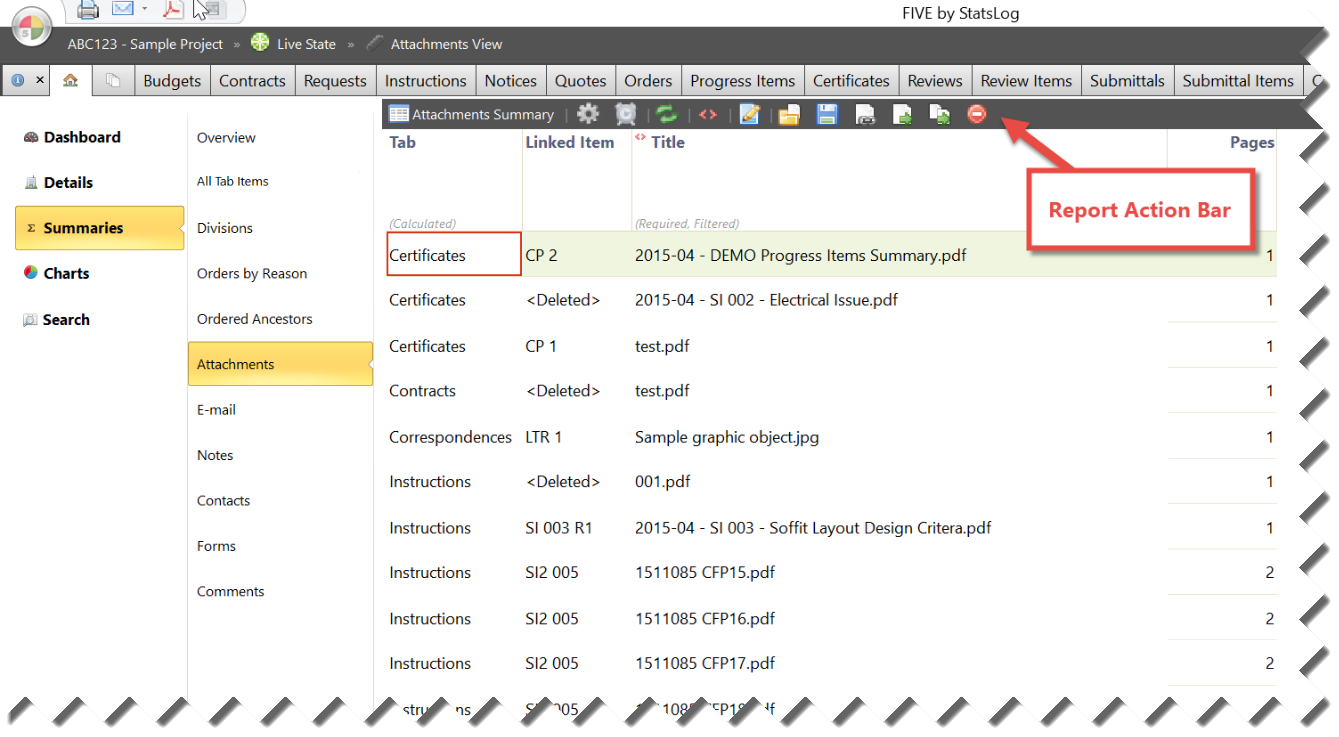
Figure 51 The Attachments Summary report.
Email Page
The Email summary page shows a report of every outgoing email message that has been sent from FIVE. This report can be particularly useful for auditing purposes as you can export a list of every outgoing email related to the project in a couple of clicks.
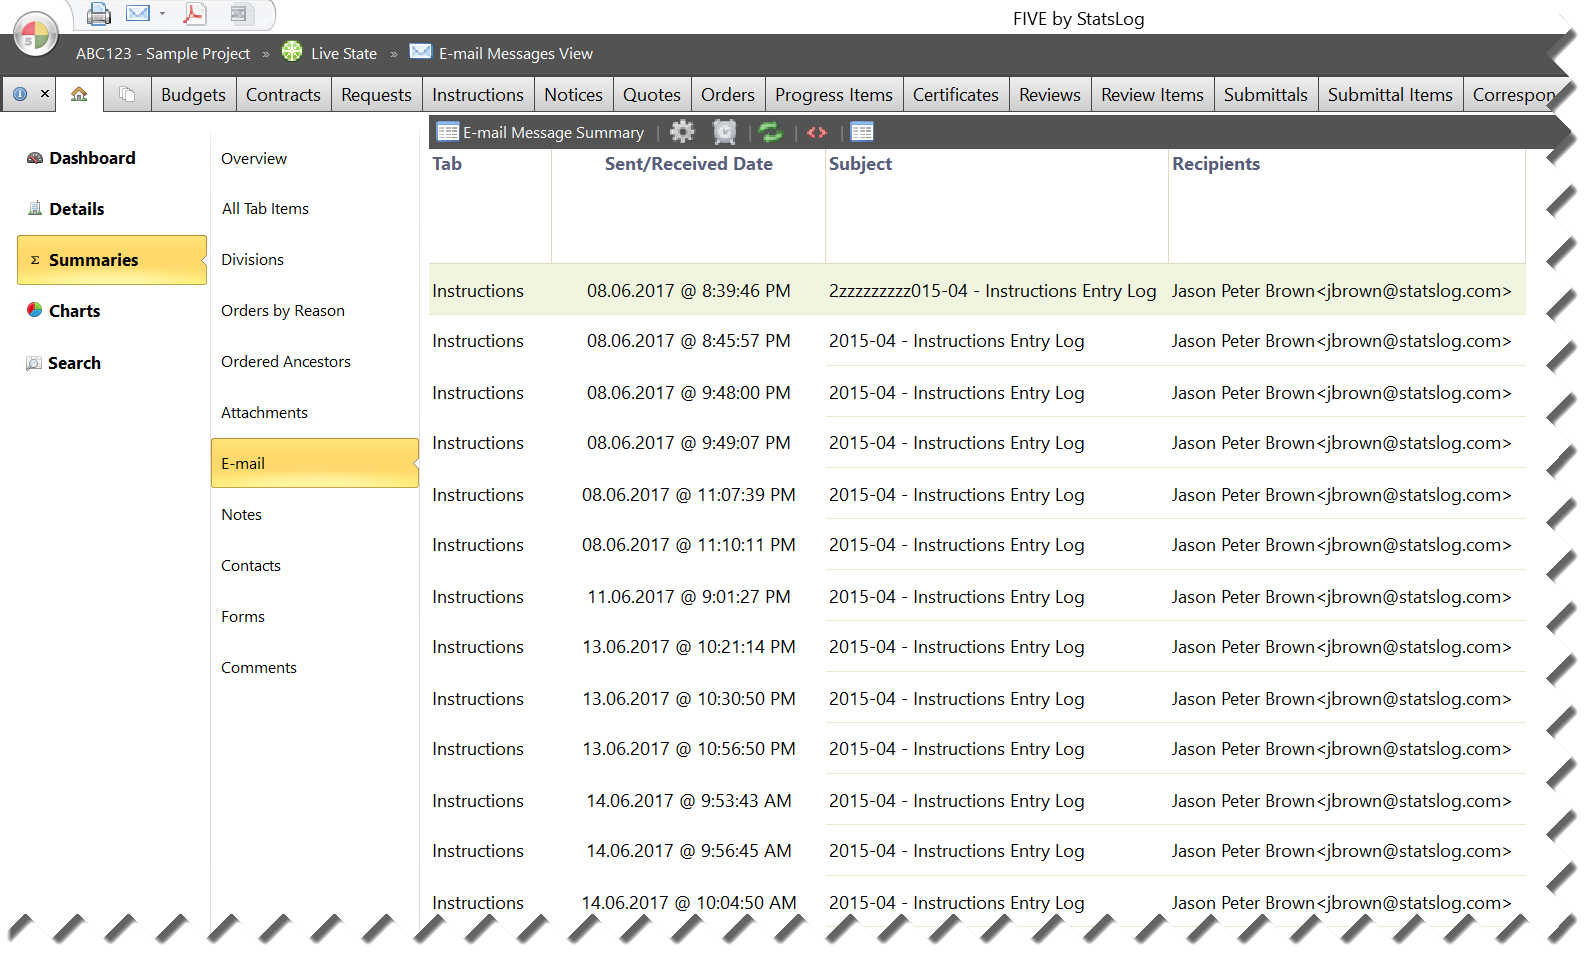
Figure 52 The Email Summary report.
Notes Page
The Notes summary page shows a report of every note written for every logged item on every tab. This report is useful for doing in-depth reviews of all of the project’s notes.
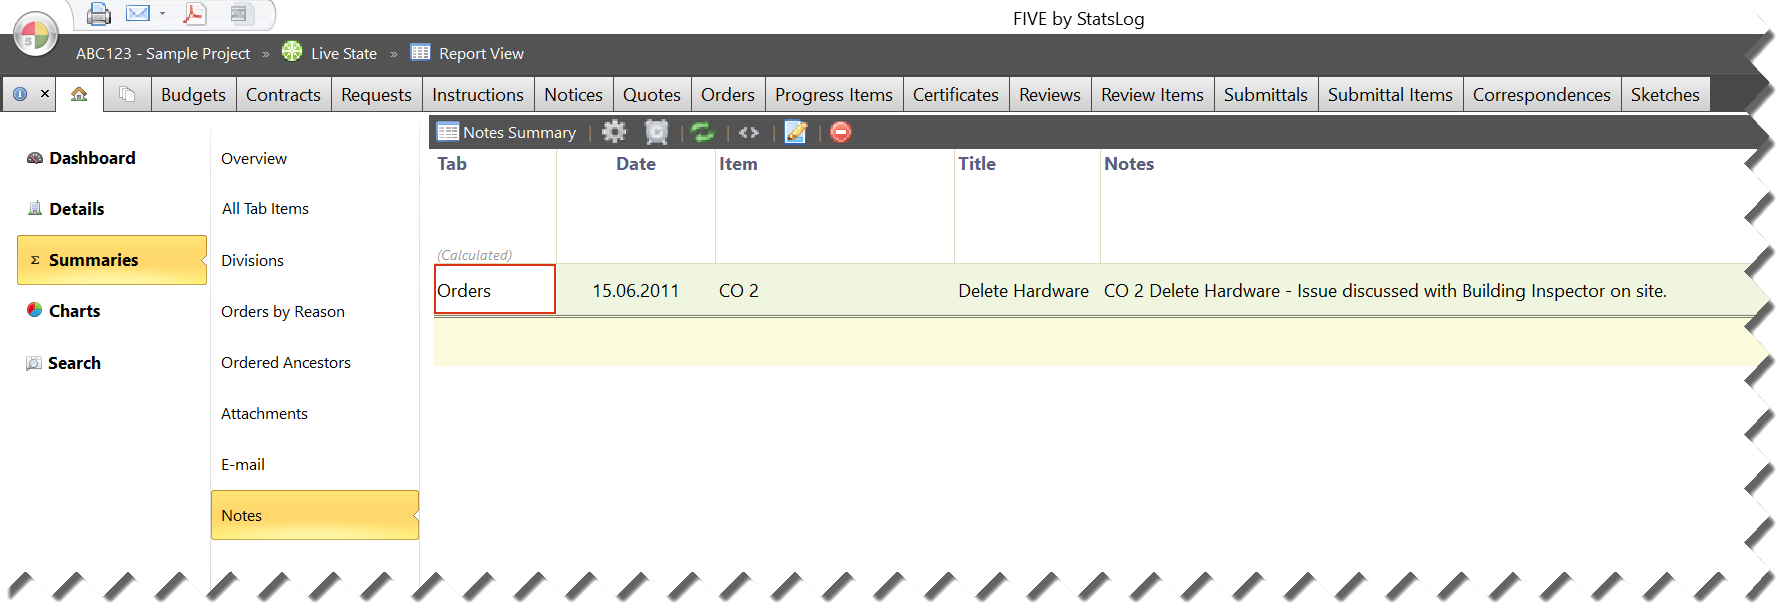
Figure 53 The Notes Summary report.
Contacts Page
The Contacts summary page shows a report of every contact associated with the project.
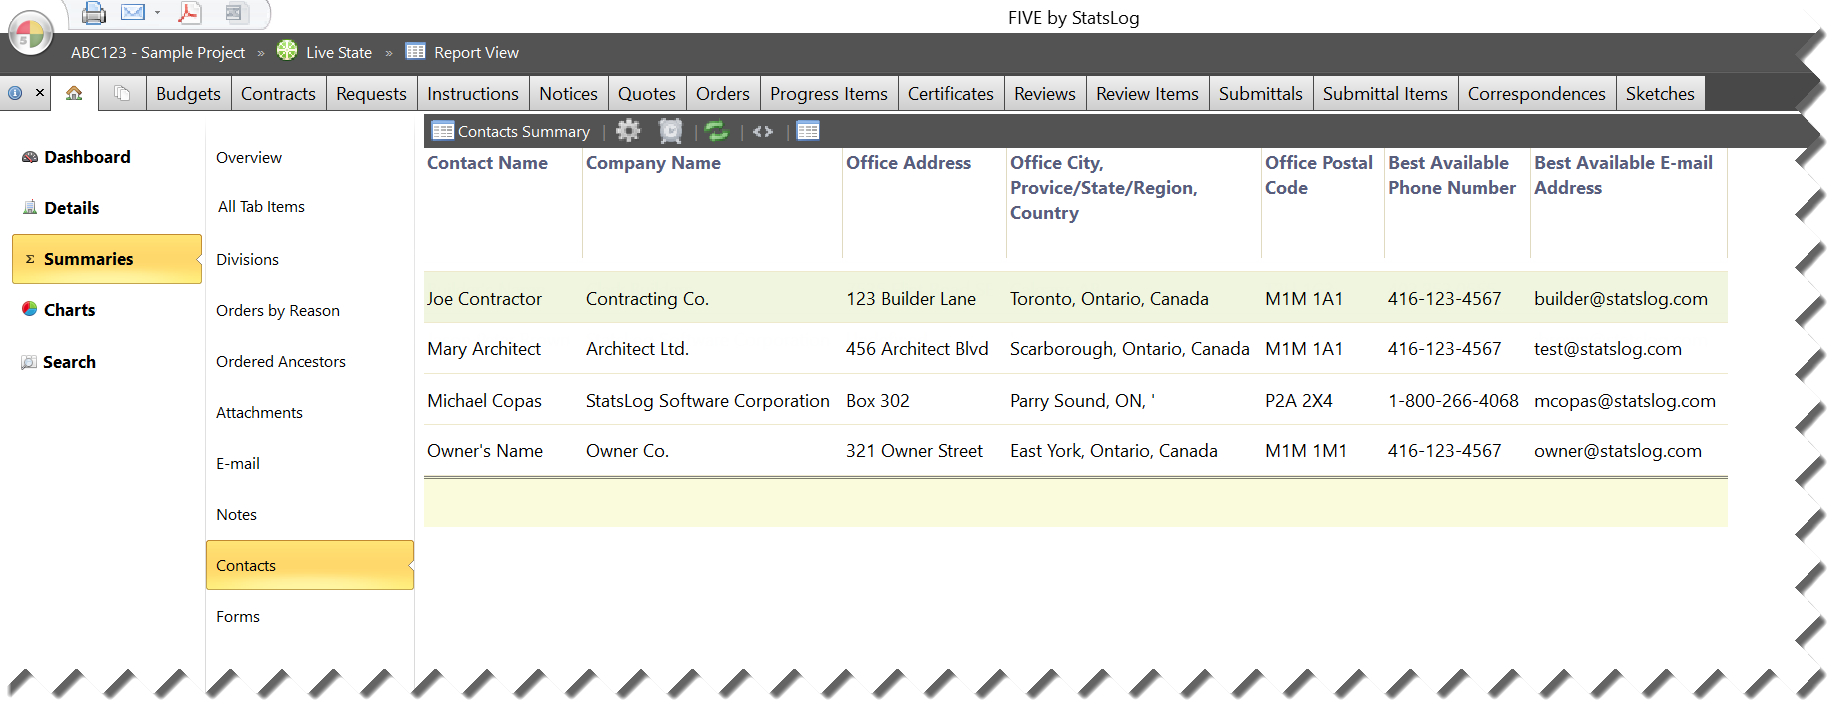
Figure 54 The Contacts Summary report.
Contacts can be modified, added to, or removed from this report from the page. For more information, see the Contacts Page section.
Forms Page
The Forms summary page shows a report of every form type and template available on every tab in the project.

Figure 55 The Forms Summary report.
You can add new form types, modify existing form types, or delete unused form types using the buttons in the Report Action Bar.
Comments Page
The Comments summary page shows a report of every comment added to the project. Comments are required from the user for certain actions (such as rolling back certified progress), and this page allows you to review all comments in one place.
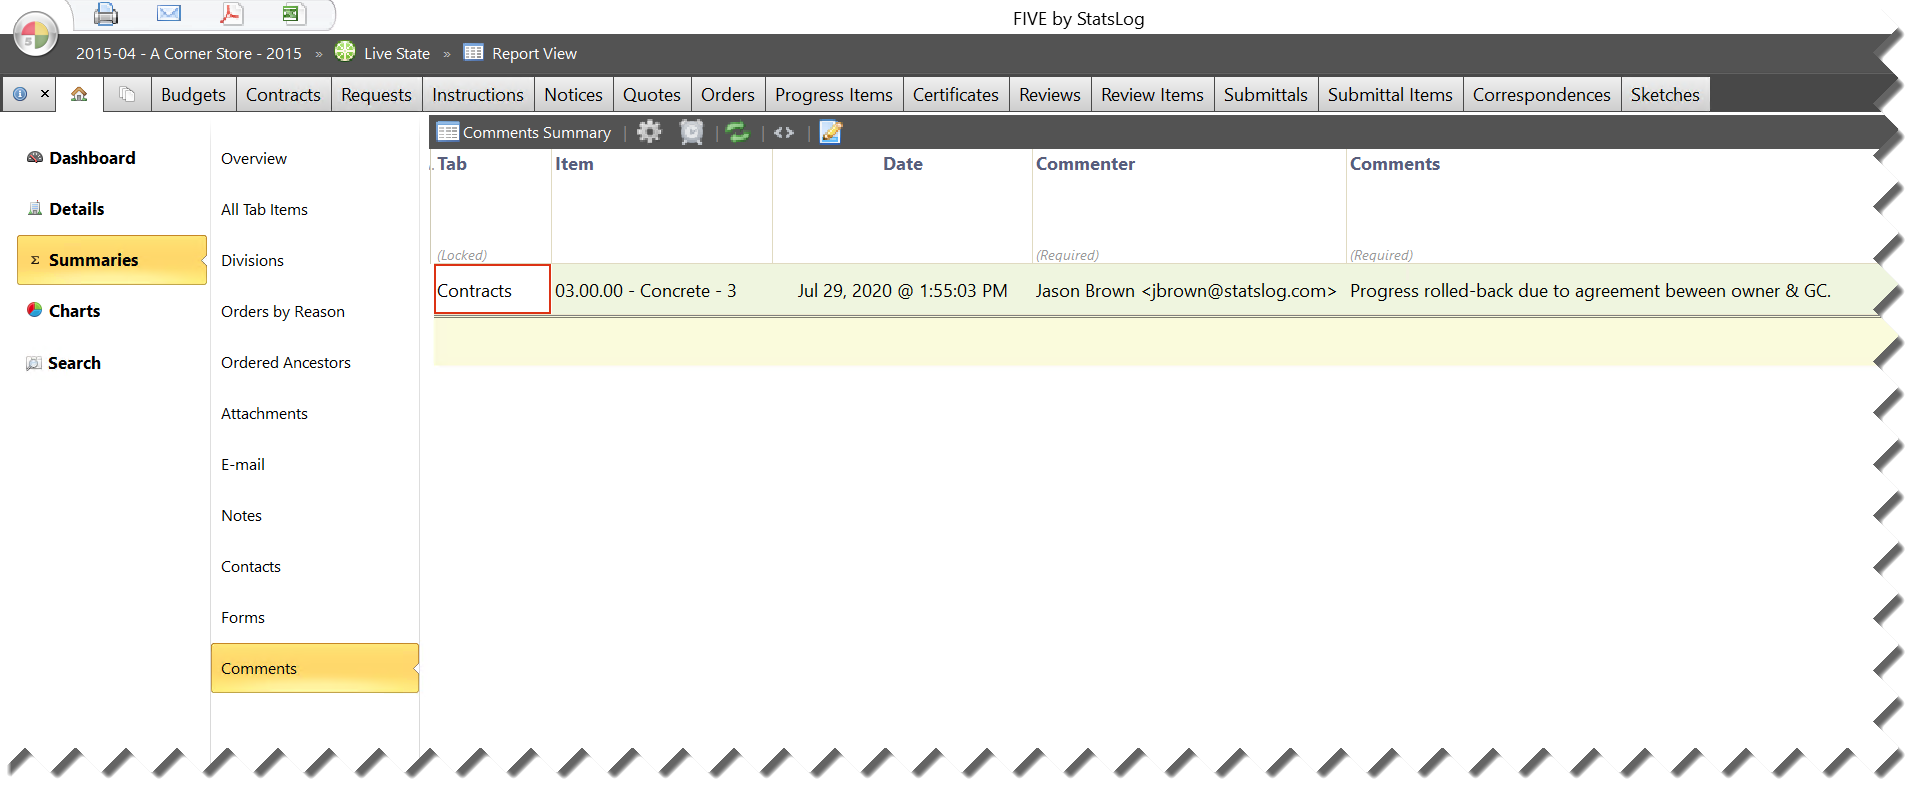
Figure 56 The Comments Summary report.
Charts Page
The Charts page is yet another example of miMO in action.
Charts are automatically generated from information logged on other tabs - with no extra manual work required. Charts provide a visual repesentation of your project data, giving you a different perspective on the state of your project.
Work Summaries Page
When you click the Charts button, the Work Summaries page appears:
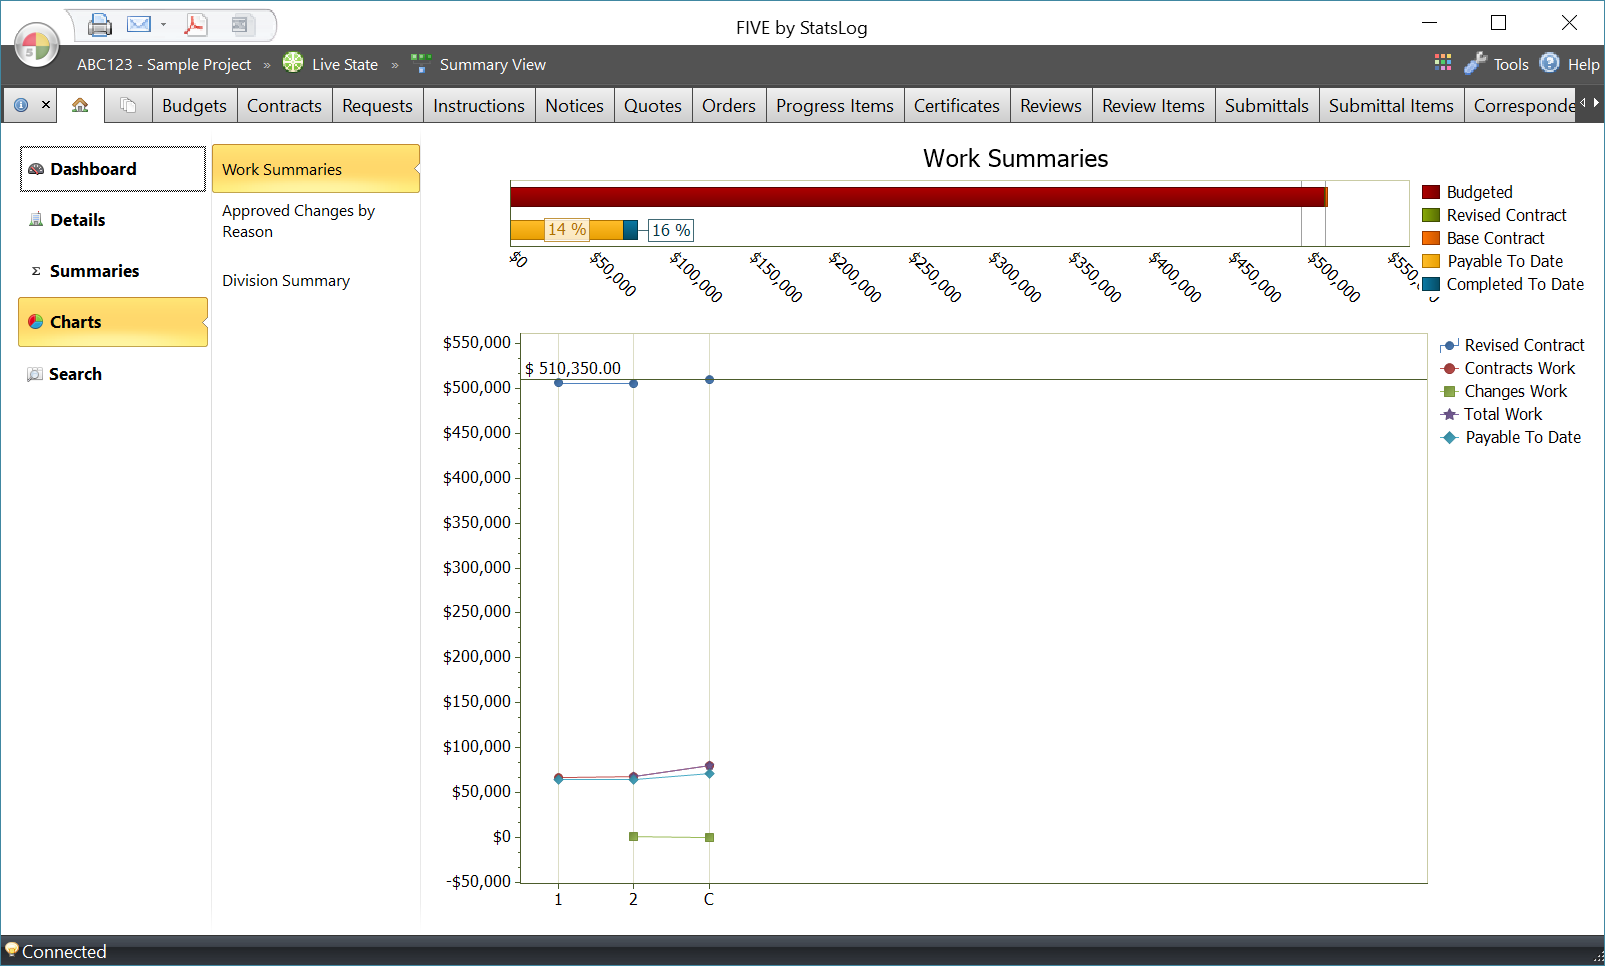
Figure 57 The Work Summaries chart.
The Work Summaries chart is split into upper and lower sections.
The upper section shows the budgeted amount vs. the base contract amount vs. the revised contract in the first bar, and the payable amount vs. work completed to date amount in the lower bar. As work on the project progresses, the length of lower bar will get closer and closer in length to the upper bar.
The lower chart is a line graph showing the work completed against the revised contract value at each certificate. Work against the base contract is separated from work against changes, giving you a visual indicator as to when changes might be having a significant impact on the project.
Approved Changes by Reason Page
The Approved Changes by Reason page shows a bubble chart of all approved change orders grouped by reason:
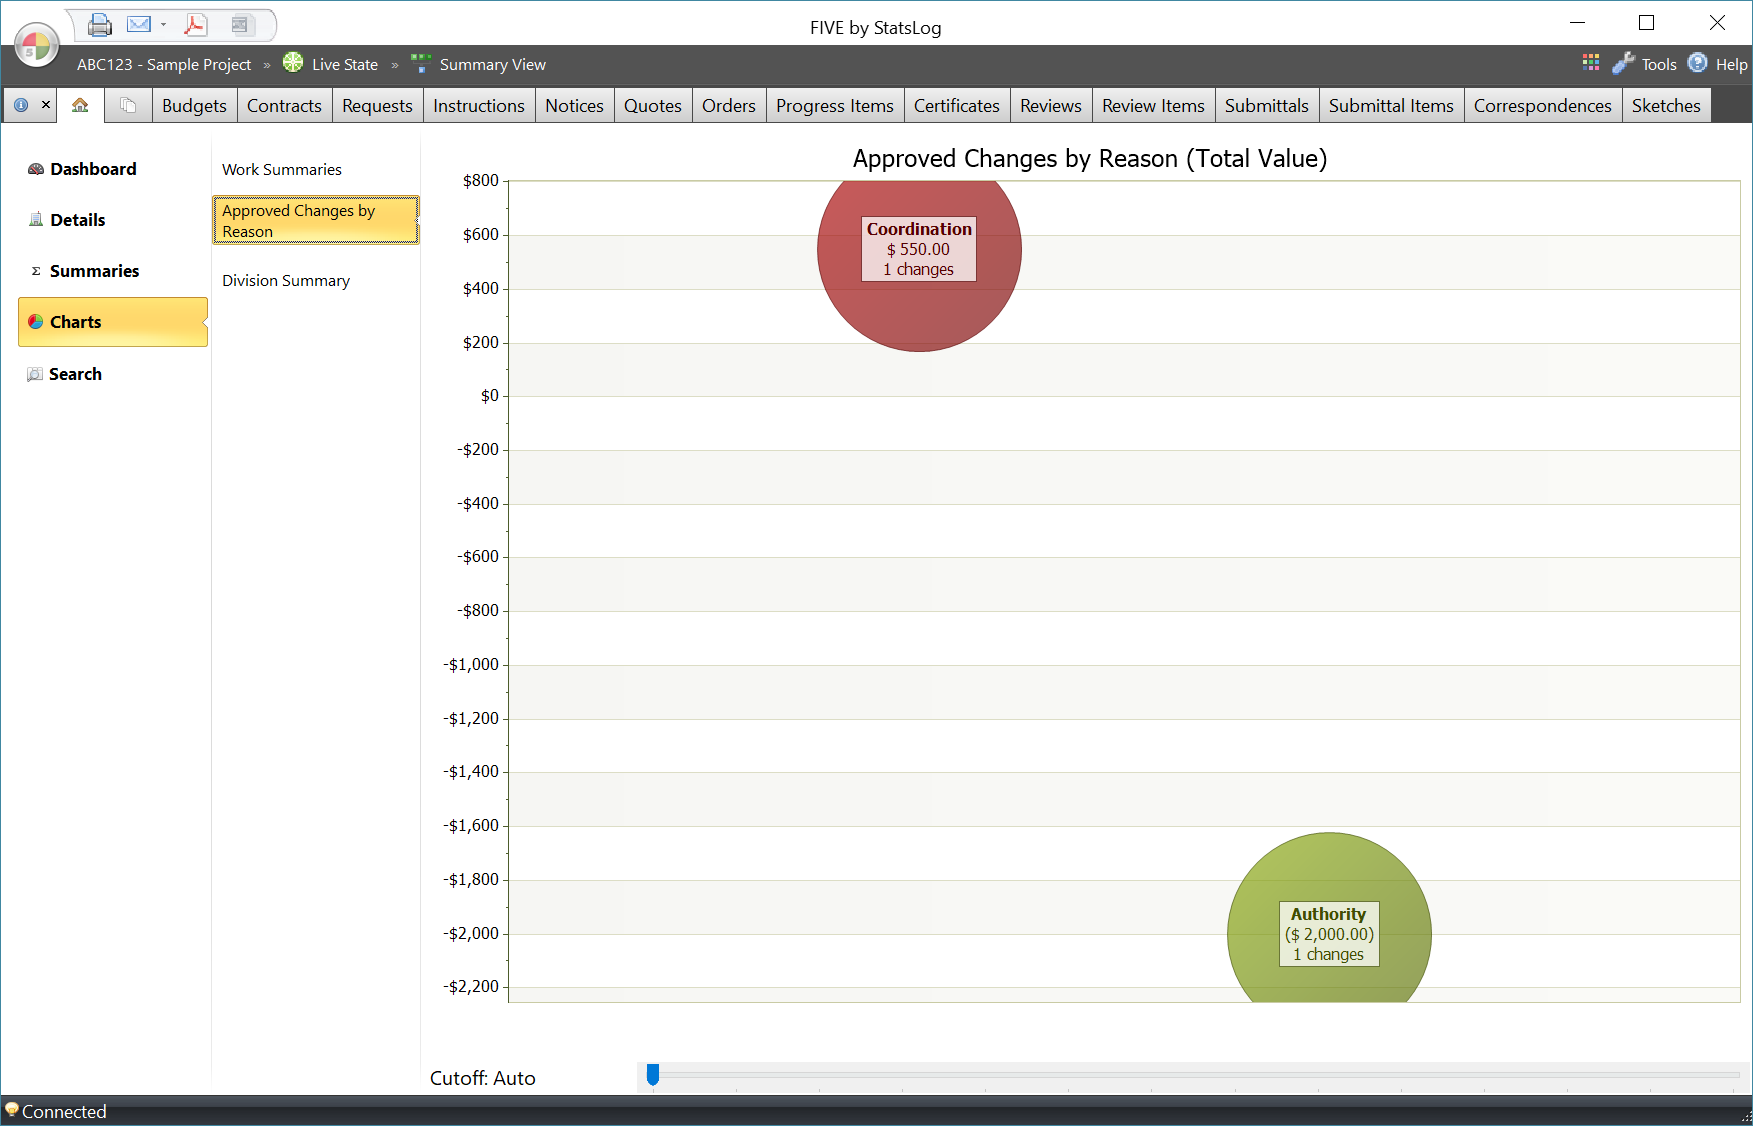
Figure 58 The Approved Changes by Reason chart.
Each bubble represents a single “reason” with one or more approved changes. Reasons are customizable, but usually include things like “Owner Request”, “Site Conditions”, etc…
The higher up a bubble appears on the chart, the greater the impact that reason is having on the revised contract value. Conversely, the lower down a bubble appears on the chart, the lesser the impact. The larger the bubble, the more individual change orders have been issued with that reason. Likewise, the smaller the bubble, the fewer individual change orders have been issued.
Bubbles are displayed from left to right by highest to lowest impact on the revised contract value.
Ideally, you want to see small bubbles floating near the zero line - meaning you have only a few low-value changes to the contract.
Tip
You can change the cut-off value for the number of reason bubbles by dragging the “cut-off” slider below the chart.
Division Summary Page
The Division Summary chart groups together all items on the Contracts tab by their associated division (usually a MasterFormat division) and shows the percentage of the base contract value that each division accounts for.
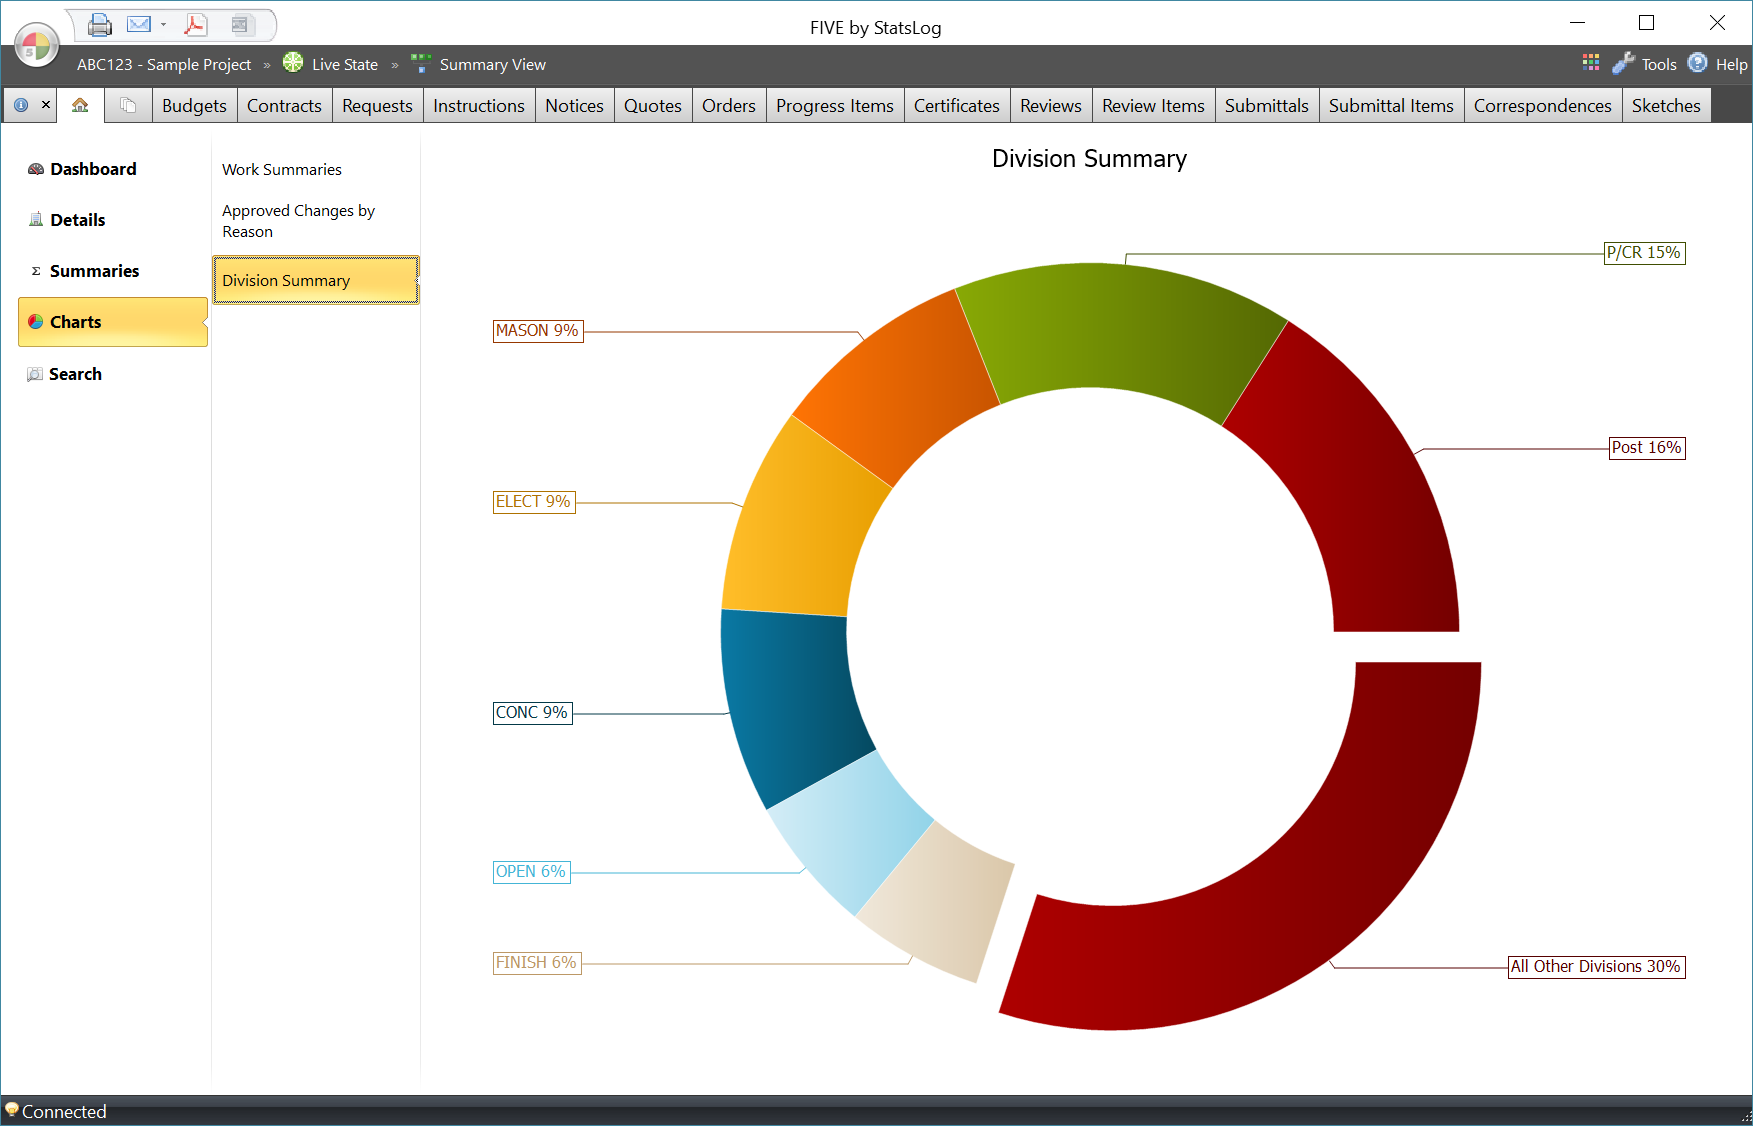
Figure 59 The Division Summary chart.
Search Page
The Search page makes it quick and easy to find all project items related to any keyword. To perform a search:
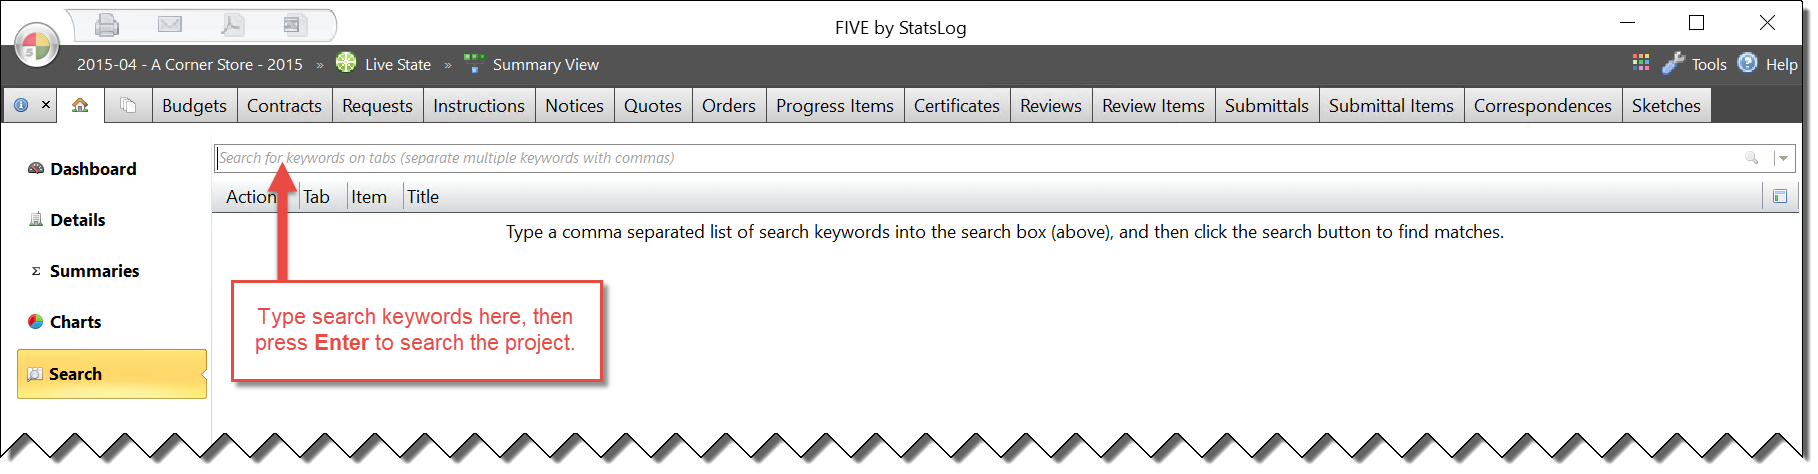
Figure 60 The Search page.
On the Search page, type the keyword (or comma separated keywords) you want to search for in the Search for keywords box.
Optionally select search options by clicking the
 button beside the
  button. The following options appear:
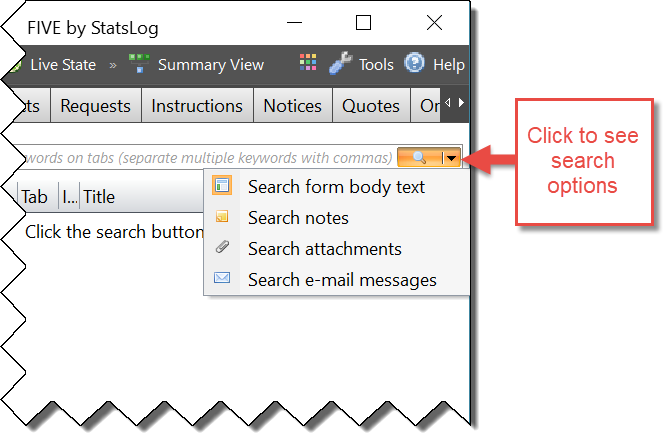
Figure 61 The Search Options menu.
Click the
button (or press the Enter key) to perform the search across all tabs and optional search targets.Click the
 button beside any result to jump to the selected item on its tab.
For example, below are search results for the keyword “door” in our small sample project:
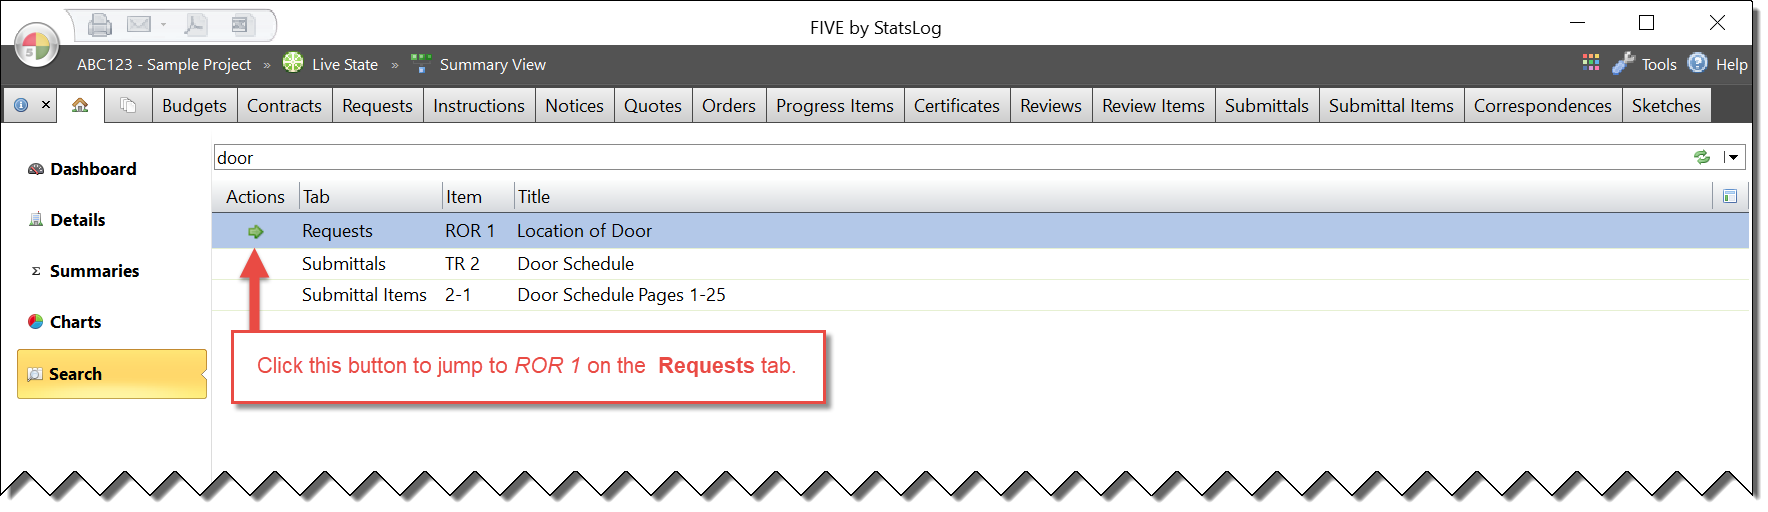
Figure 62 Search results for the keyword “door”.